
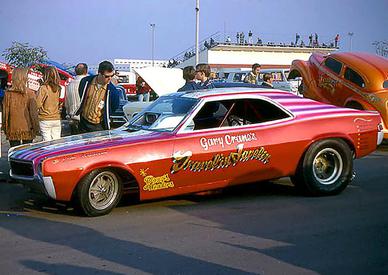
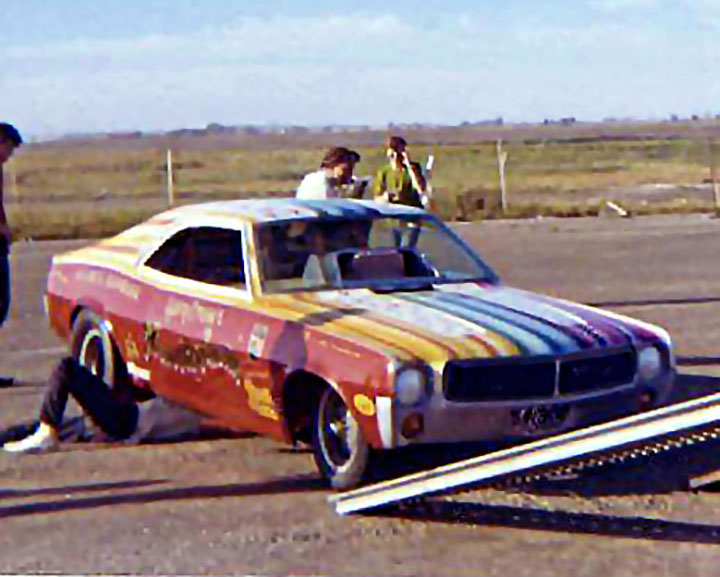
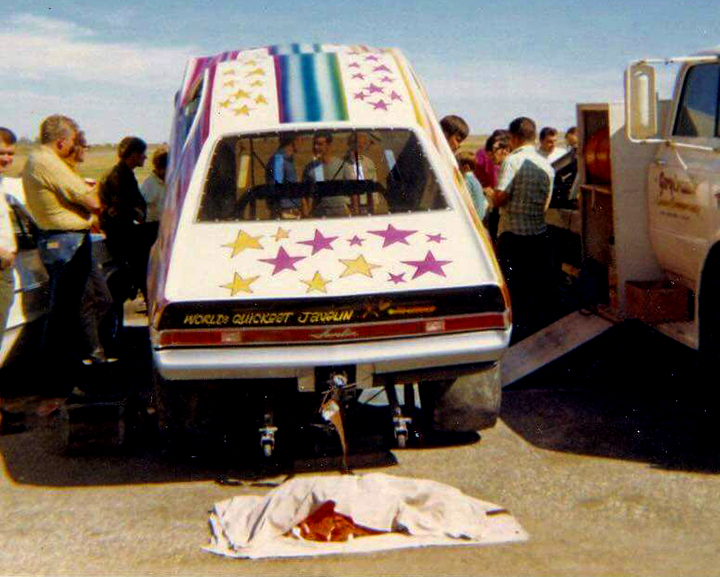
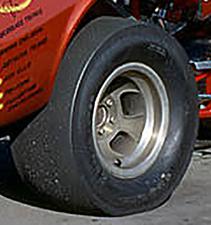
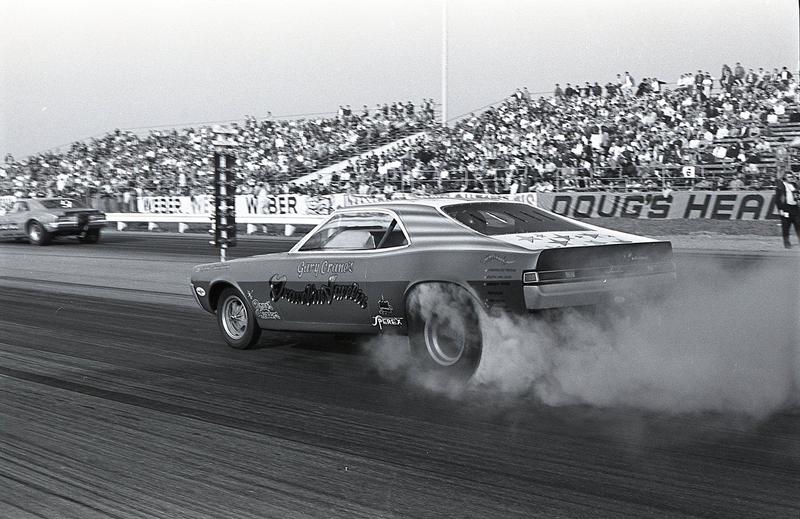
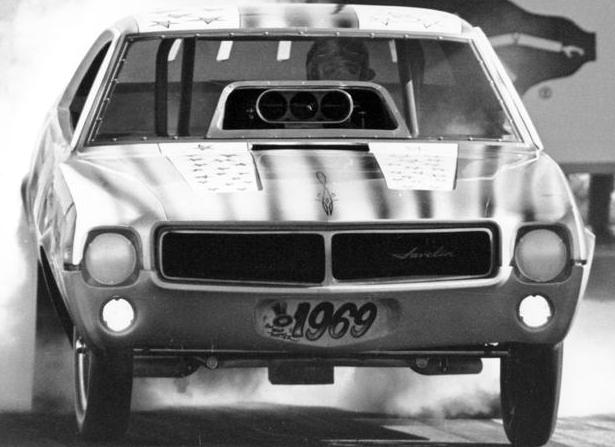
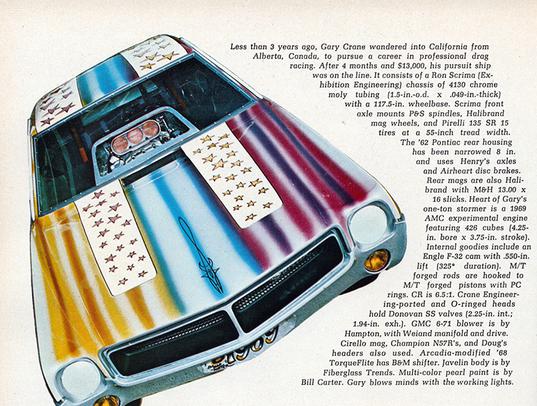
AA/FC Travelin Javelin
Orange County International Raceway.
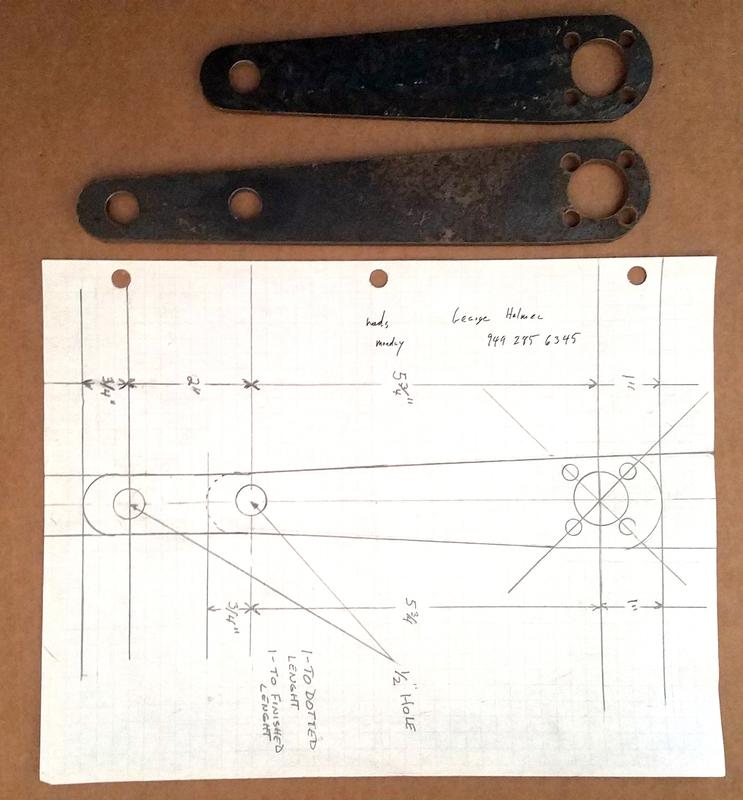
George Helmer Racing
Lion's Drag Strip
Travelin Javelin Page 2
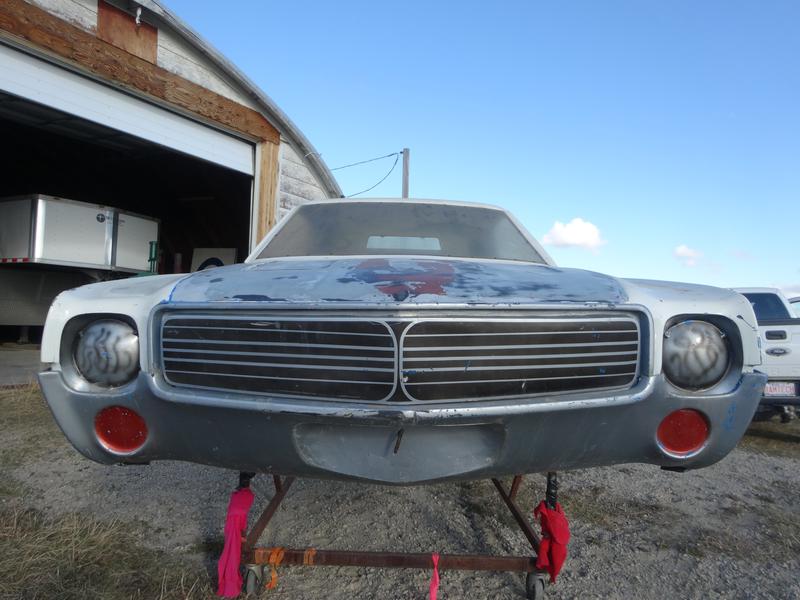
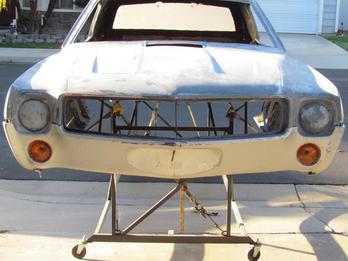
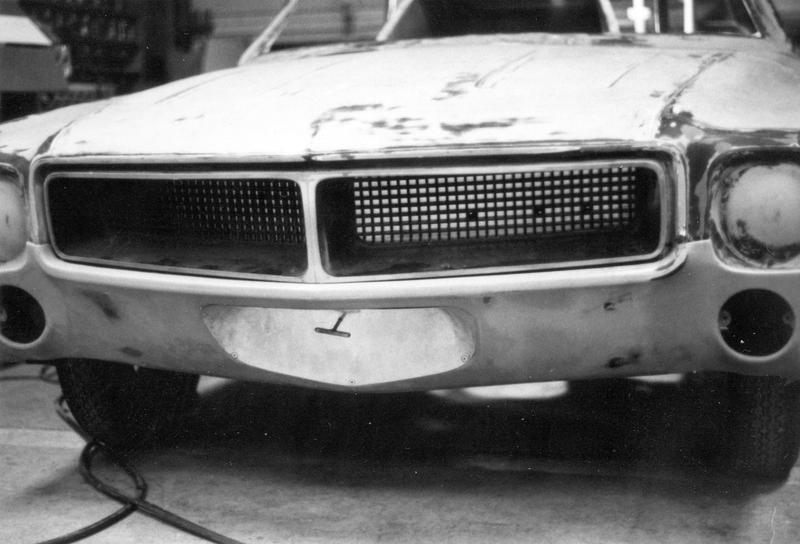
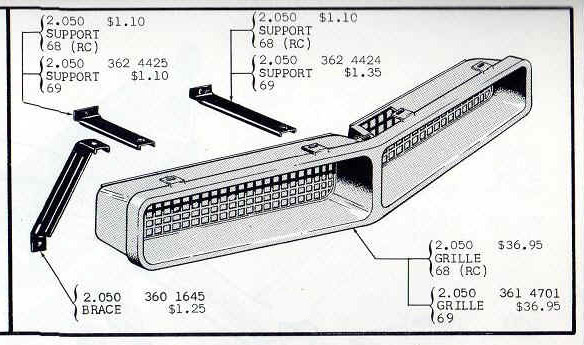
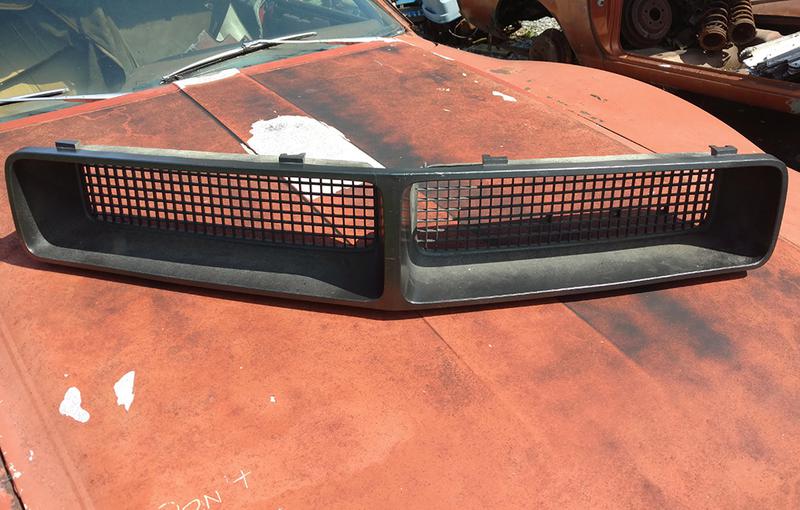
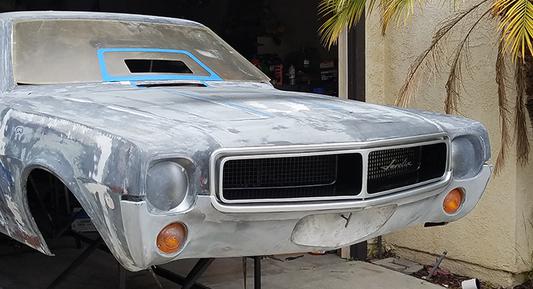
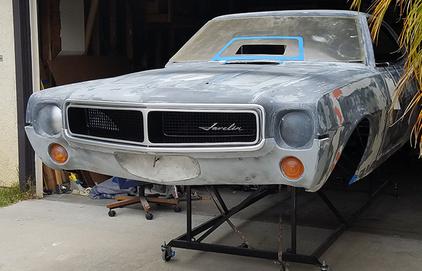
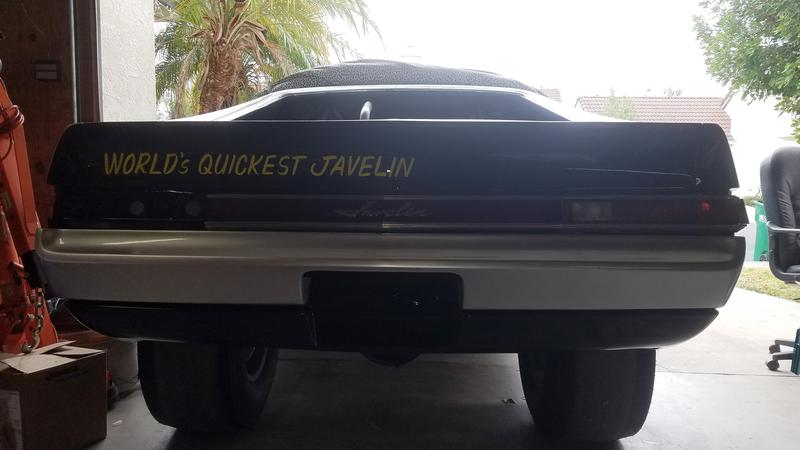
The original Javelin body used a stock front grill from a 1968 Javelin. The 68 and 69 grills are interchangeable but are different in appearance. The small multi square inter flat panel on both sides of the grill opening has no raised center pieces on the 68. The 69 has a horizontal raised and a bit thicker center strip running from one side to the other on both halves of the grill. On the driver's side of the grill opening is also a vertical strip that cross the horizontal strip making what they call a crosshair in the grill and a bull's-eye badge, where as the 68 has a 7.5 inch Javelin emblem located on the drivers side.
I've looked for months trying to find a 68 grill over the internet without any luck. I made calls to everyone I could think of and finally located one in Pennsylvania from JJ Walter who is out on Facebook. I purchased a 68 grill from him which had a crack running across the top and bottom in the center and was holding on from breaking in half buy a few inches in the center. No matter, it was the best I could find or can say the only one I could find and was happy to get it.
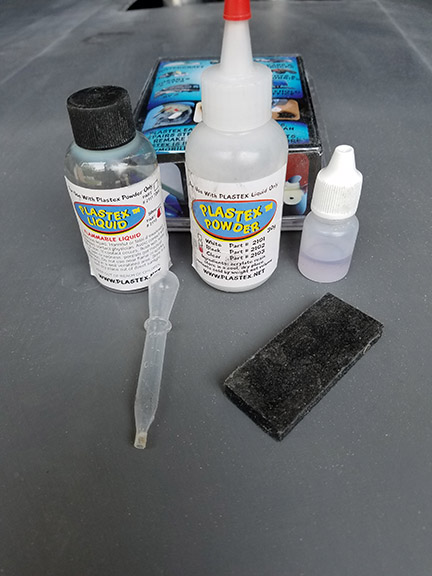
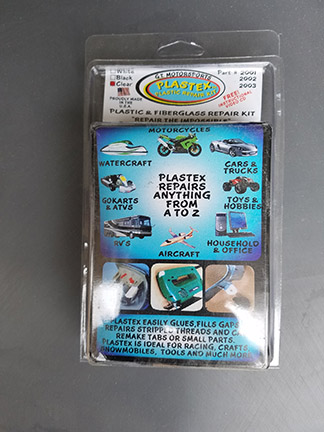
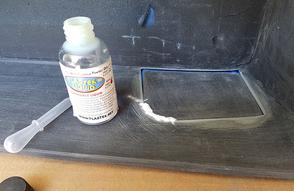
After purchasing it and knowing of the cracks I did some research and purchased a product by Eastwoods for repairing plastic. It's called "Plastex" from G.T. Motorsports and comes with a container of very fine plastic powder and a bottle of liquid hardener. This stuff is great and with a little trial & error I got the repair done and looking like new again. At the same time I built up a little extra product in the back of the crack piece to strengthen it and I'm sure the rest of the grill will crack apart before my repaired section.
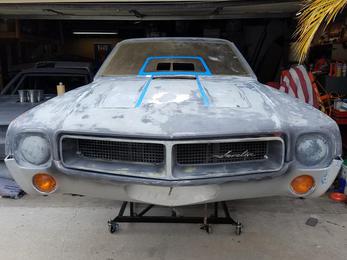
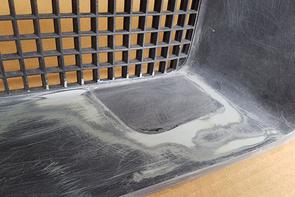
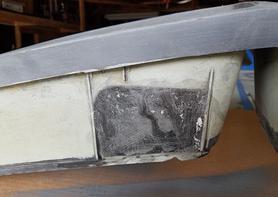
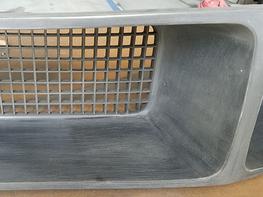
Next, I sanded the grill down to the original paint or to the plastic in the front and to the plastic in the back so I can fiberglass it into the body. I sanded the grill opening in the body and filled any issues then primer it with a couple Coates. The photos below show the grill in the original car then when it changed in the second generation Travelin Javelin in blue. They cut the back part of the grill out and fiber glassed a piece across the front for arrow dynamics I'm guessing. You can see it better as the body transformed into the "Rainmaker" car. Last photos, now the car looks like the old one with the grill sitting in it and the parking lights/turn signals installed.
Next, I will show how I glassed the top part in the grill. Nothing is simple and if you look at the grill in the original car you will notice that behind the grill there is a piece of aluminum blocking the air from coming into the body. I'll have to do a little engineering on this because I have to make it so I can pull the aluminum out to clean it.
As I purchased it from Wild' Al Weich in Canada.
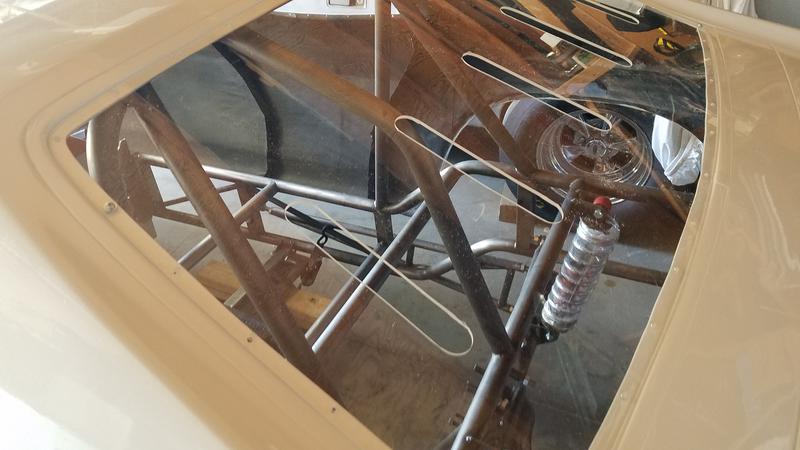
Wow! The front looks like the original configeration. Notice, I'm setting up the windshield opening.
G.T. Mororsports "Plastex" product from Eastwood.
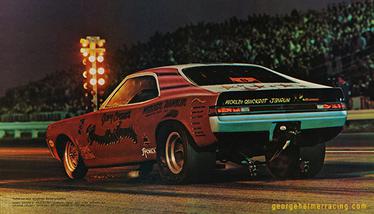
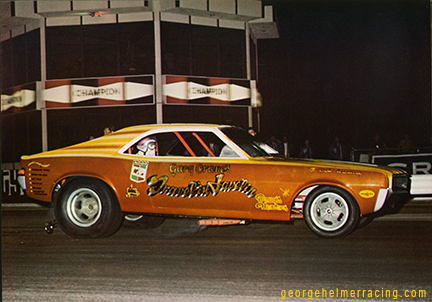
Original Travelin Javelin 1969 O.C.I.R
Third generation Rainmaker car with filled in grill and parking lights.
Second generation blue car as change is taking place. Notice the aluminum behind grill. Later they cut the grill back out.
AMC grill and orginal cost 1969. Can you believe $37 dollars, should have bought ten of them.
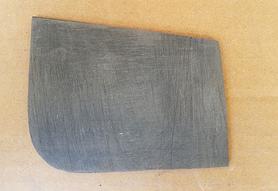
Photo of 68 grill purchased from JJ Walter at his home. You can't see the cracks in this photo.
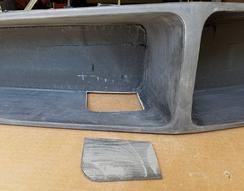
Removal of grill or what was left of the grill and new parking lights installed.
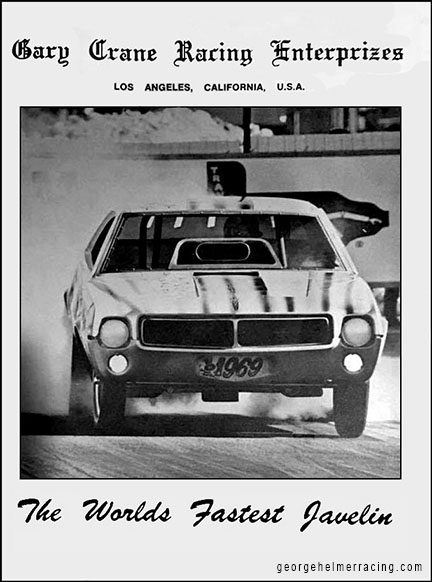
A very rare piece of literature from Gary Craine's company. Thinks this is at Lion's. This run has the parking lighs turned on.
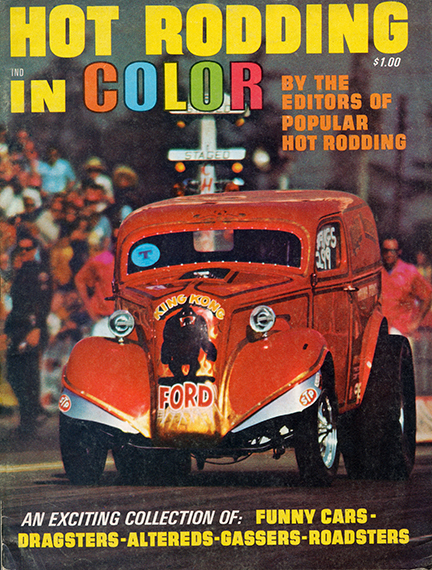
Hot Rodding in Color has this photo in it on page 30 Summer 1970. It was also taken at Orange County International Raceway in California but during a different event. You can tell from the maguire's sticker on the front fender in the photo above and behind the door at the at this event. Small details but that's how you identify information from photos. In future details I will show you how I figered out how the correct front windsheld opening was determined all from photos.
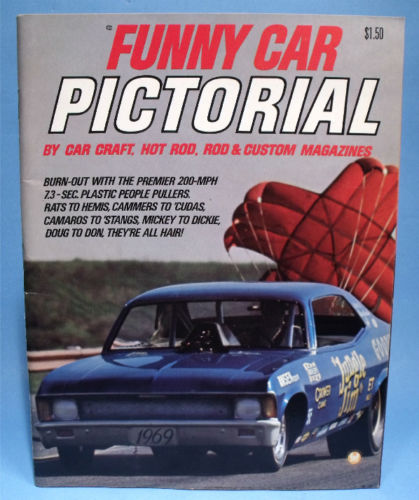
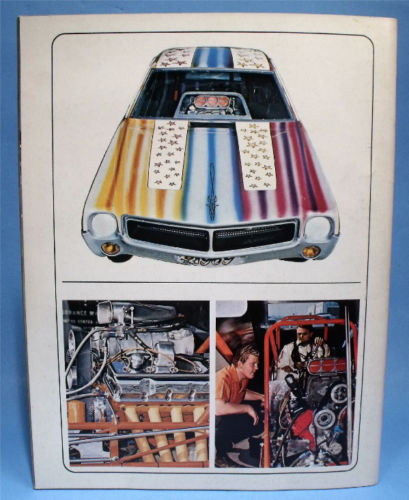
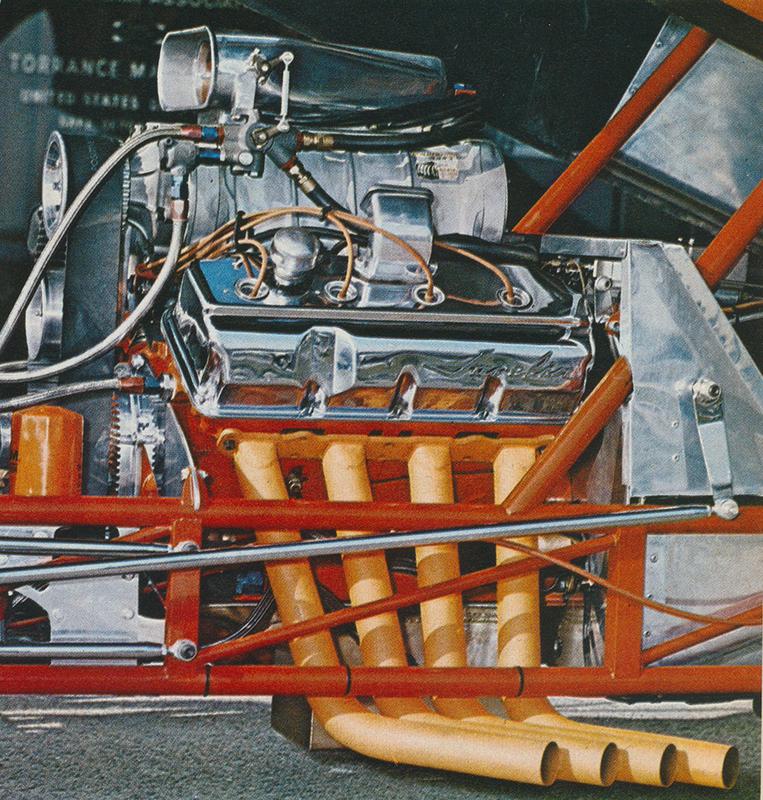
In this Funny car Pictorial (1969) you will find these photo's. Don't know if this is a mistake or not but the photo of the insides lower right above is not for this car, plus it's running a big block Chevy. It does have however an orange frame, but the wrong one.
A.
B.
C.
D.
E.
F.
G.
H.
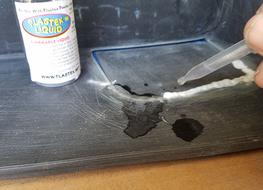
(A.) The opening and new piece for the top of the grill. The opening is for access to the hood lever that opens the hood. With the car running over 200 mph, this opening would cause extra pressure inside Travelin Javelin's body. The grill opening will also be closed from behind with a piece of Aluminum. (B.) I had an extra piece of grill top section from an AMX grill that was beyond repair which I cut to size. (C.) I carefully fit the pieces together making sure that the edges were beveled so the Plastex would make a complete bond between them. (D)Then I took the bottle of white Plestex plastic powder and squeezed a line out, a section at a time. (D.) With the eye dropper I followed the instructions on the bottle and placed drops along the white plastic that I had placed there. After each of the section dried, which took a few minutes I adjusted the two pieces each time making sure they matched up along the process. (E) The completed piece as it appears before sanding. (F.) The backside of the part from the top of the grill. I put several additional layers of Plastex for support on the back side. (G.) After sanding and a few coats of primer and more sanding with 100 grit sand paper this is what it looked like. (H). I finished primering and sanding making ready for paint. Next I will paint the grill with two colors, a satin black interior and silver for the outer section which are the same two colors used on the originally car.
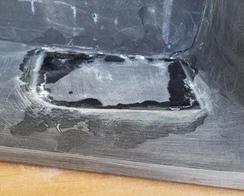
Grill Repair & Restoration
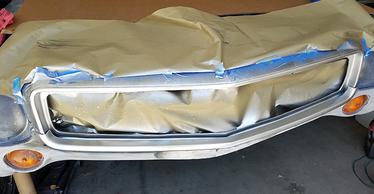

I spent hours primering and preparing the grill for paint. Then masking off the grill for the semi-gloss black for the inside of the grill opening. After letting it sit for a couple days I reversed masked it then painted the metallic silver on the outer portion of the grill. I also painted the body where the grill would be sitting with the silver. The grill now finished and looking just like the original
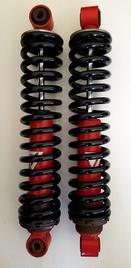

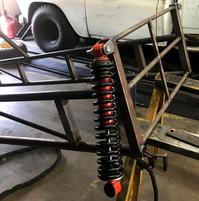
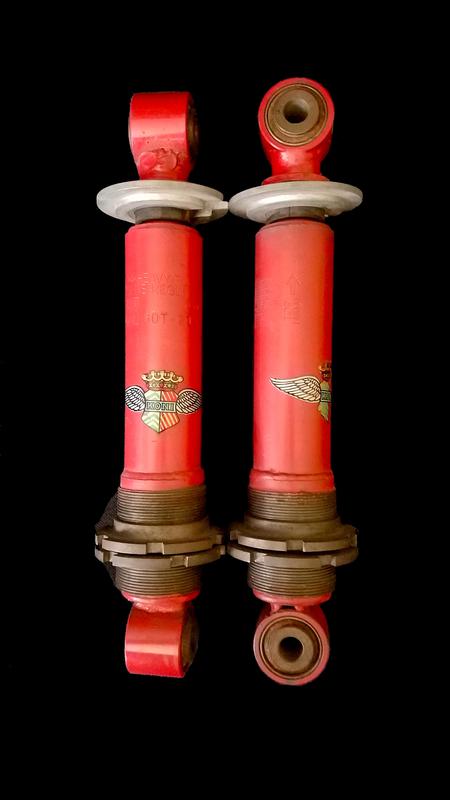
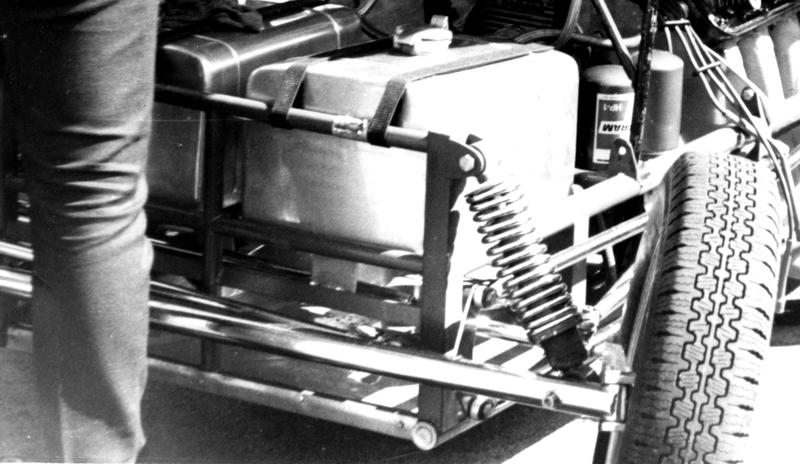
Left are the new front shocks. In fact these are new old stock Koni 80T 2091 that the car originally ran.
I will send out the coilover's to have them chromed like the ones directly left.
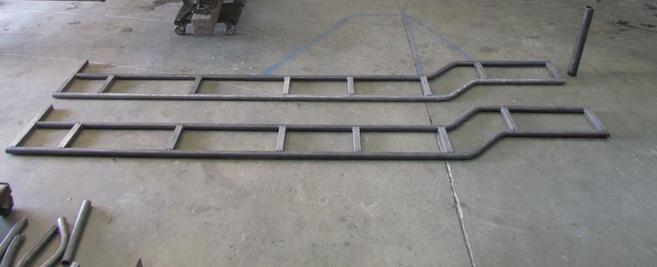
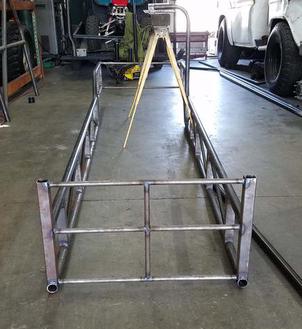
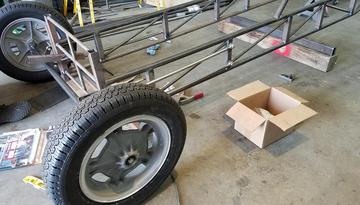
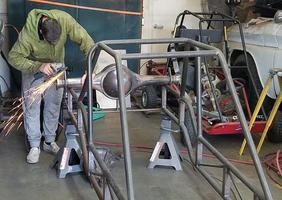
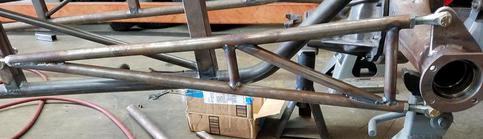
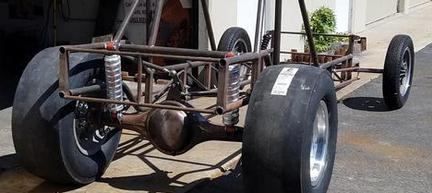
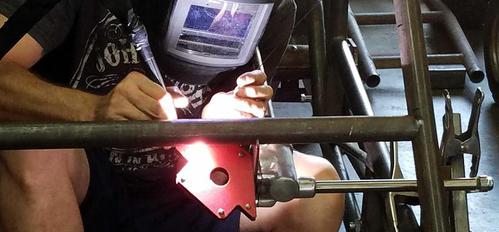
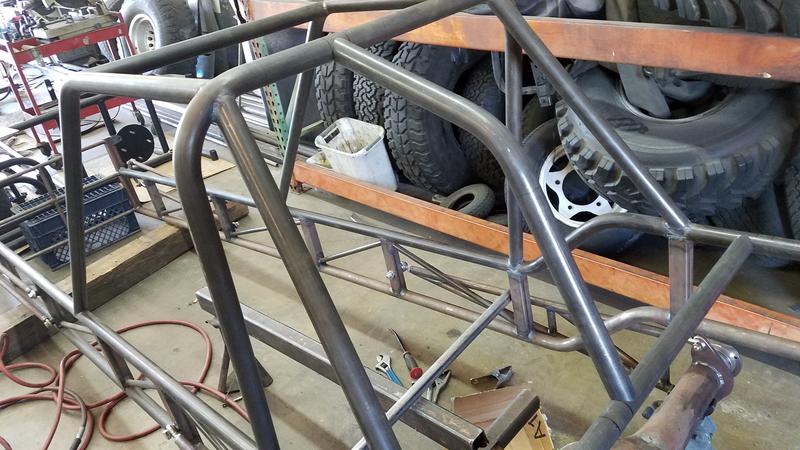
Work continues with some big updates 11/15/17. The replicate chassis is being built over at N8ZFAB in Orange California. I purchased the chromoly tubing from Industrial Metal Supply in Irvine CA to the correct specification of .049 Chromoly 1.5 inch tubing on the main rails and 1.5 inch box tubing for the uprights. I took the tubing over to Nate shop and we went over the plans. The step up chassis requires the curves to be 17 inches from upright to upright with a rise of 10.5 inches. After setting up tubing it was bent according to blueprints for the four rails. The uprights were then cut and notched so that the distant between the bottom of the bottom rail and top of the top rail was at 10.5 inches. The uprights were then placed between the rails and tacked into the correct spots. After insuring everything was correct I approved and gave the go ahead to weld them up.
Nate has a small shop in Orange California which builds mostly off road vehicles and chassis. After researching Ron Scrima at Exhibition Engineering he also had both an off road and drag chassis business. These guys have built and Nate continues to build really strong chassis for off road conditions and it only made sense that I find a small shop like this to do my chassis like the original. Next will come the .075 diagonals pieces running between the uprights.
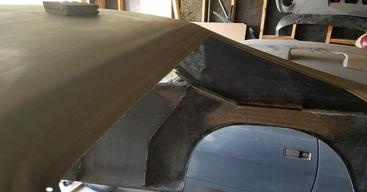
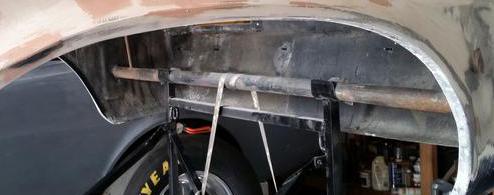
The last of the major body work has been completed with repairing the fiberglass braces for the aluminum interior over the rear wheel openings and the two notches in the rear window area to properly to gain extra space for the roll bar. They may have tried lowering the body some. In any case I had to repair this area too. Happy to have the body complete and primed with etching primer.

The two notches that have been repaired with fiberglass cloth.
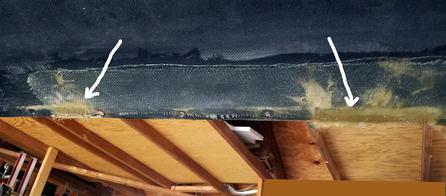
Here the arrows are pointing to the strip I had to replace after repairing the wheel wells. Now the aluminum interior will sit on top and go from the back window donw to the flat then up and over the top. The aluminum will be attached by rivets.
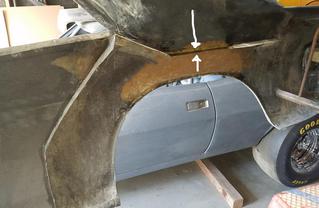
This is what the fender looked like with the flares removed. The brace was missing for the aluminum to sit on because the flares took them out.
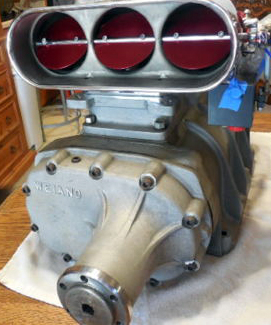
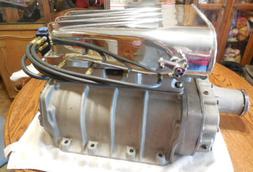
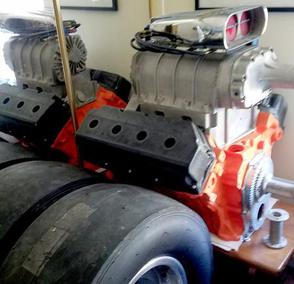
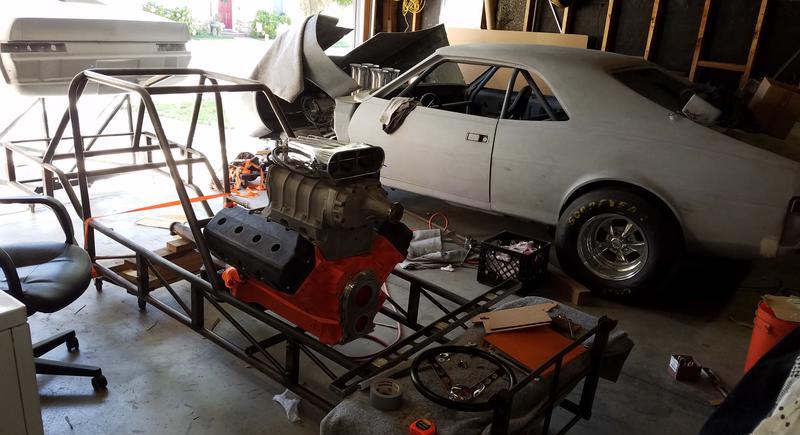
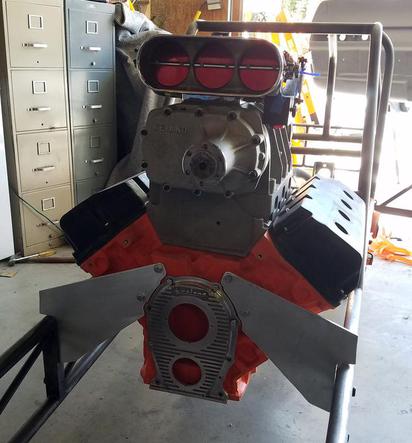
Two more very rare pieces located the Weiand supercharger and the Enderly bug catcher. I have been looking for these two items for over a year. They are in the best you could ever want new old stock blower and rebult injector. Thanks to Bruce Frank who listed them on E-bay they are one the way.
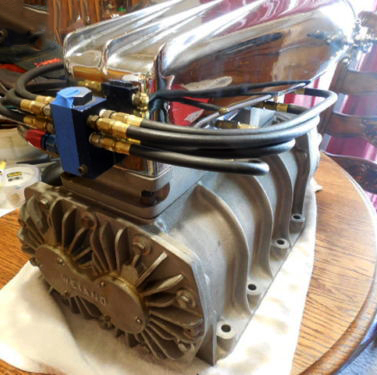
Left side with throttel linkage and fuel system.
Right side with injector hoses.
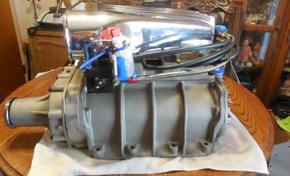
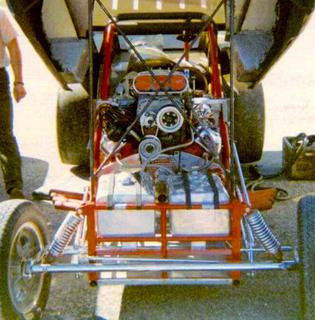
Rear view of blower and injector.
Ebay Purchase
Brand: Enderle
Type: injector, Bug catcher
Vintage Fuel Injection Enderle hat from the 60's. Super rare and hard to find. Red butterflies. All new re-built by Gene Adams in 1994. Has not been used since. Has been sitting. Have all paperwork for re-build. All new lines, barrel valve, injectors . Hat was chrome plated 50 years ago, still in amazing shape. The 671 Weiand blower is from the 60's. Still brand new from the factory. Never mounted, never used. In amazing condition.
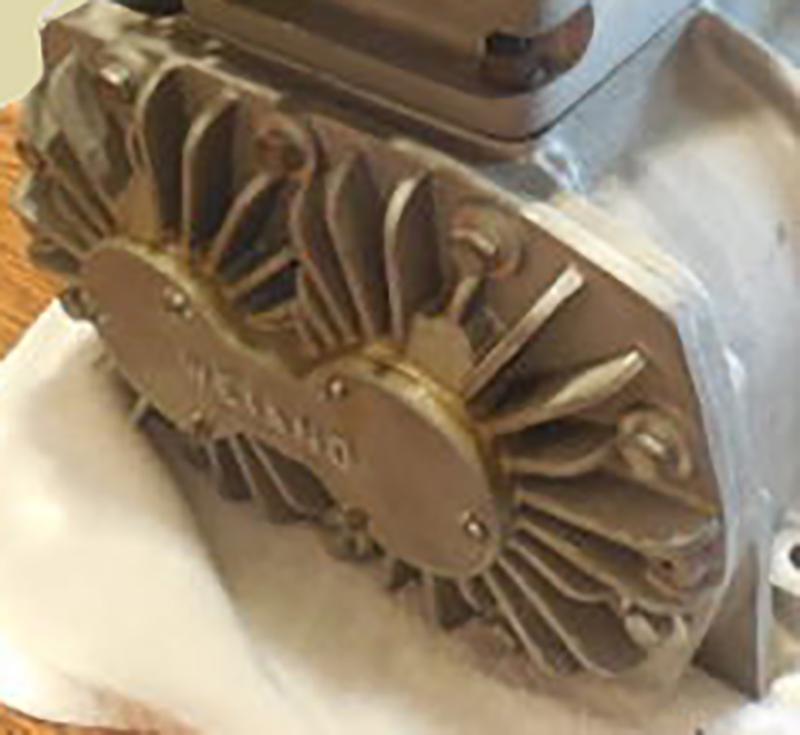
Close-up with Weiand cover.
Front of blower and injector. Has Weiand on left side.
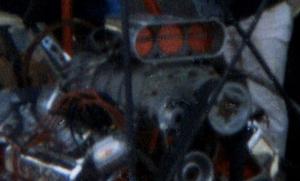
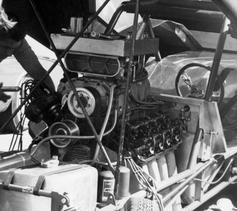
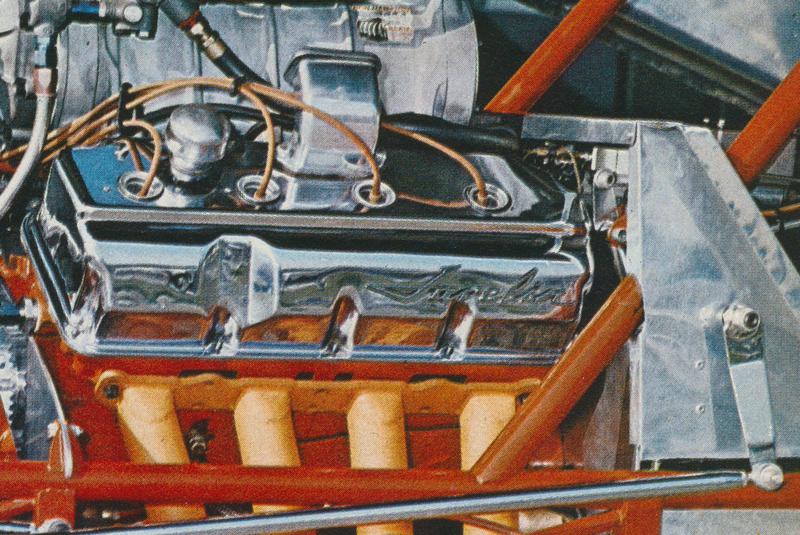
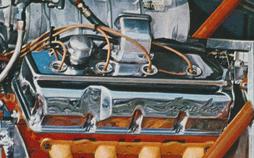
426 Hemi Engine of original car with front view of the blower and injector.


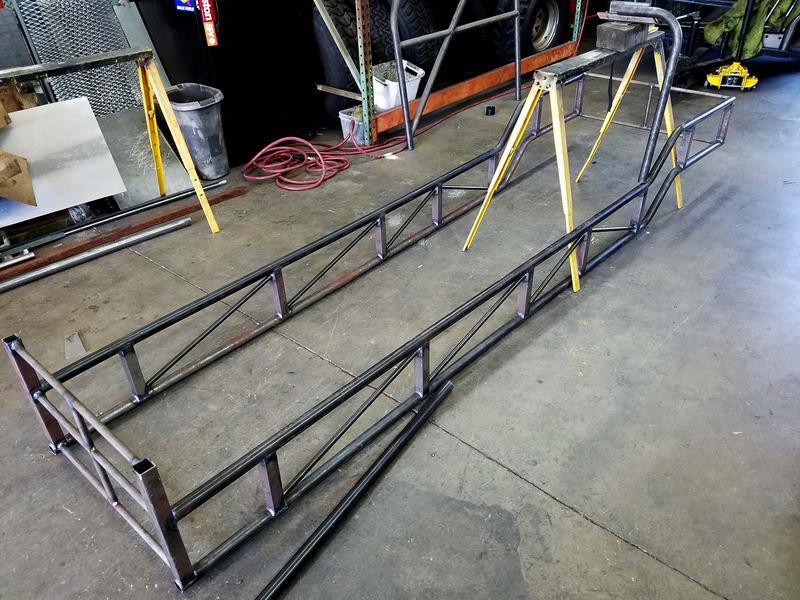
The diagonal braces are welded between the uprights and the center upright in the front is complete. Yesterday and today I went to the chassis builder to go over the roll bar which will be started today. A whole lot of planning in the chassis. Had to go off of old original photos and measurements from another Scrma chassis.
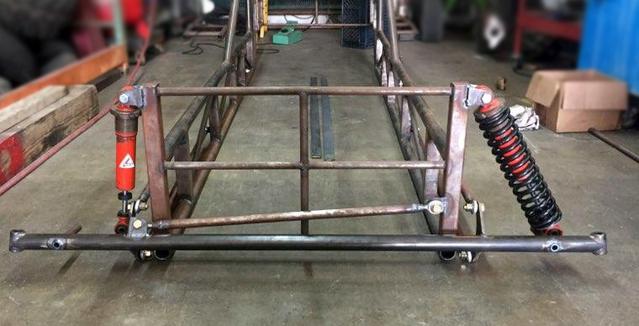
Parts to Build Front Suspension
Updated 05/20/2021

Making some good progress on the chassis. All but one upright on the roll bar and that should have been done yesterday afternoon along with the cross members in the back. We will start working on the front suspension this week.
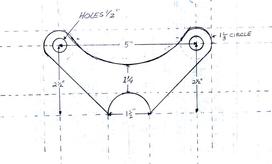
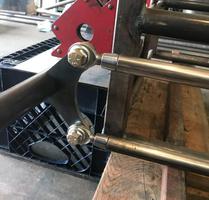
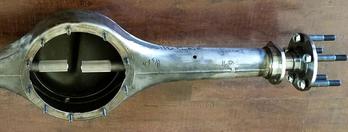
After reviewing my photos of the front axle that I had and going to the NHRA Museum to look at another Ron Scrima chassis from the same year, I designed the front axle brackets for the front radius rods. The dimensions are 5" on center for the 1/2 holes, 2 1/2" axle hole to the 2 holes on the part.
Parts made at Elite Waterjet in Santa Ana, California.
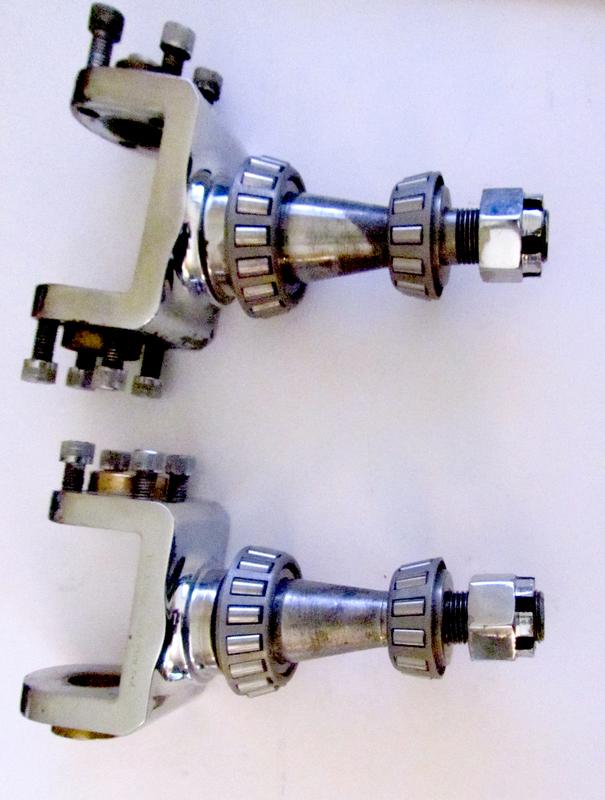
Right photos are of the spindles. These are vintage P-S Machine Products which was located in Downey, California. Extremely difficult to find these are what were used on the car.
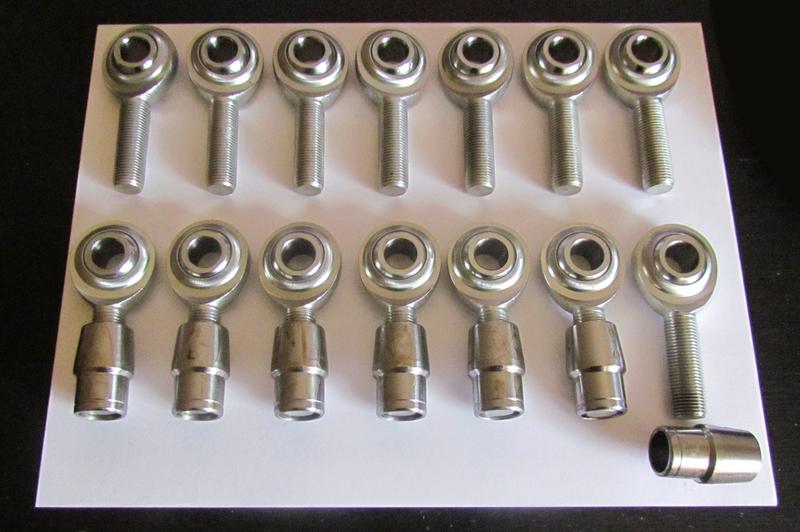
Right: 1/2" Heim Joint Ends both right and left hand male along with 7/8 x .065 x 1/2" tube adapters both right and left hand.
The radius rods drag link and swag bar are all made from 7/8" .065 tubing which will be welded to the tube adapters. I will cover this later.

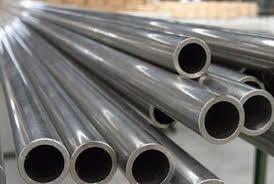
Front Axel from S& W Performance Group Spring City, PA. Size is 1 1/2 x.120 4130 Chromoly tubing King Boss 1 7/8"
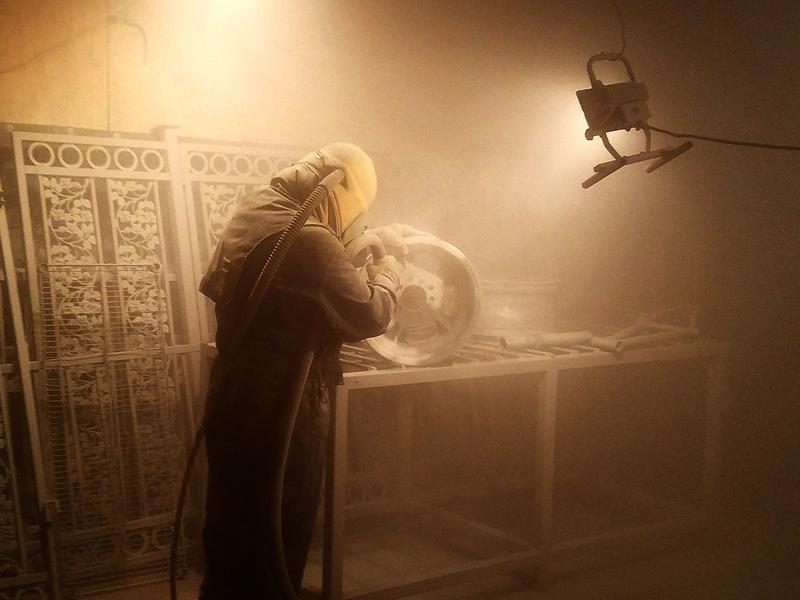
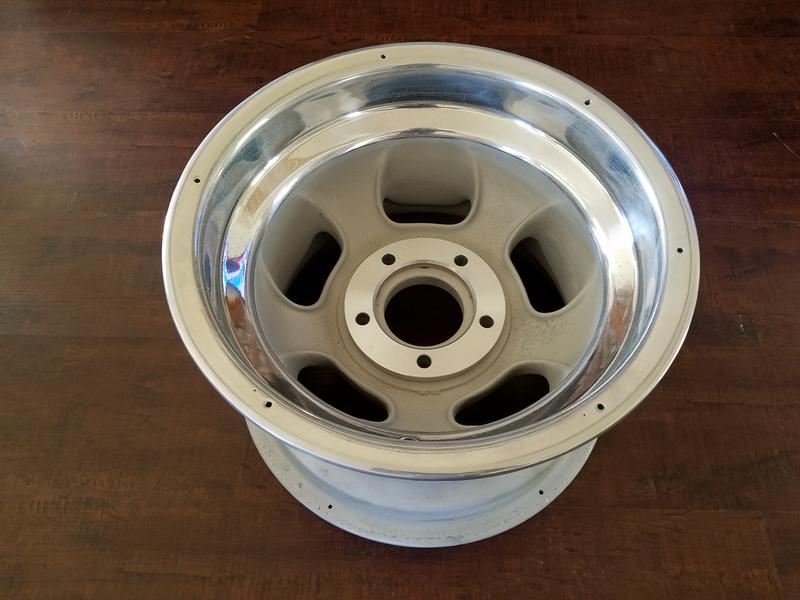
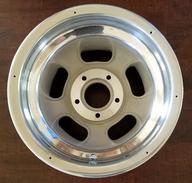
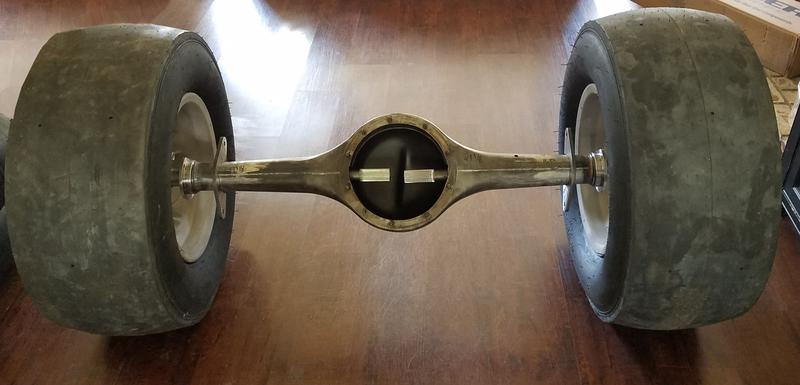
While waiting on the front end to be fabricated I'm working on getting things together for the rear end. Next week I will install my new tires on these Halibrand 10x16 rims. I had them sandblasted over at Primo in Huntington Beach 714-596-4242. Cost was $40 each. Then took them over to David Segal Metal Polishing in San Clemente 1-949-296-5478 where he polished the outer ring for $60 each. They look like new although fifty years old.
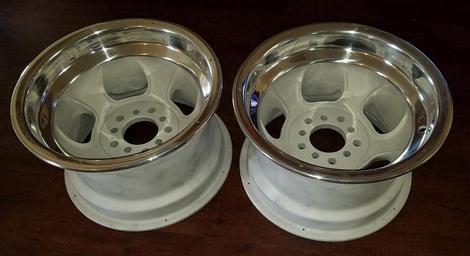
Restored Halibrand sprint wheels 1960's vintage
Sandblasting wheels at Primo in Huntington Beach
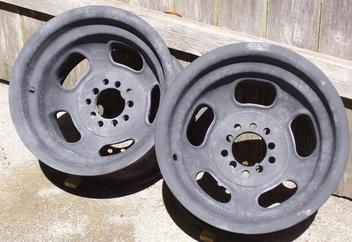
Left: The original as I purchased them a couple years ago. A far cry from the finished restored rims below.
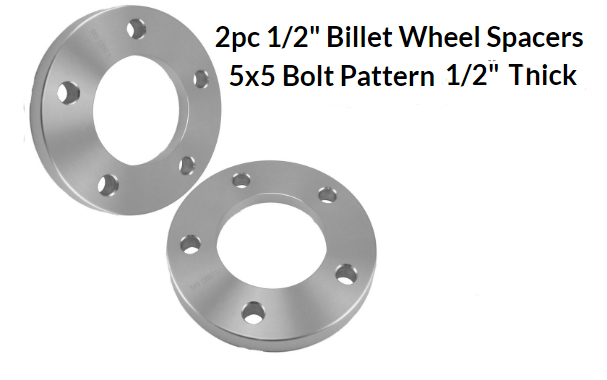
Titanium Wheel Spacers by Titan Wheel Accessories cover the extra holes in the rim and just like the on the original car as shown on the above right photo.
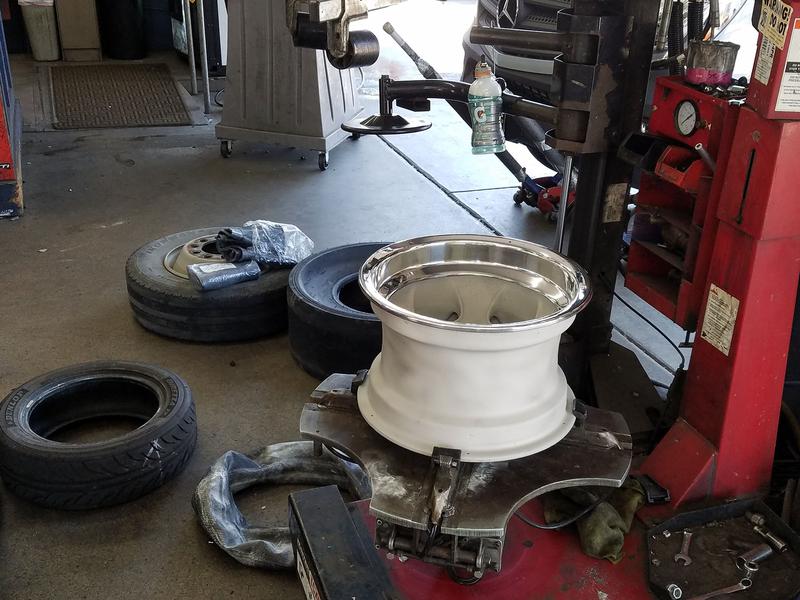
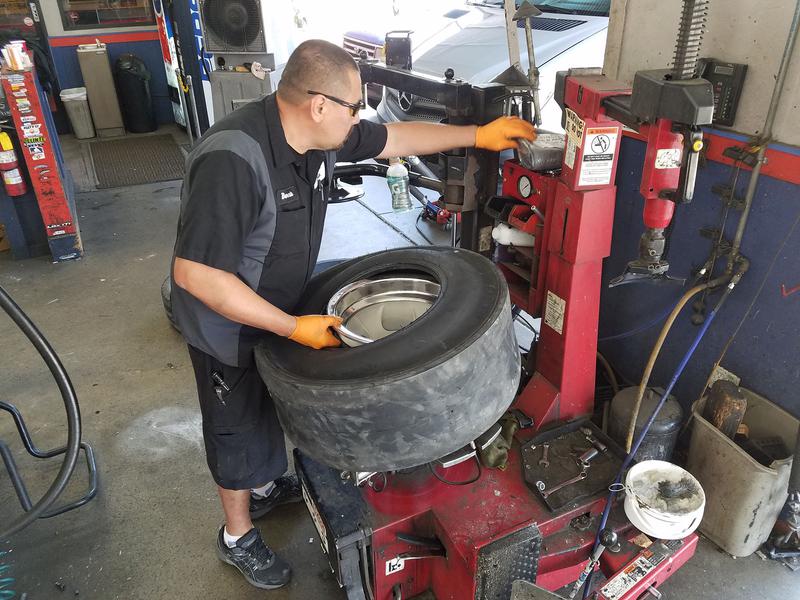
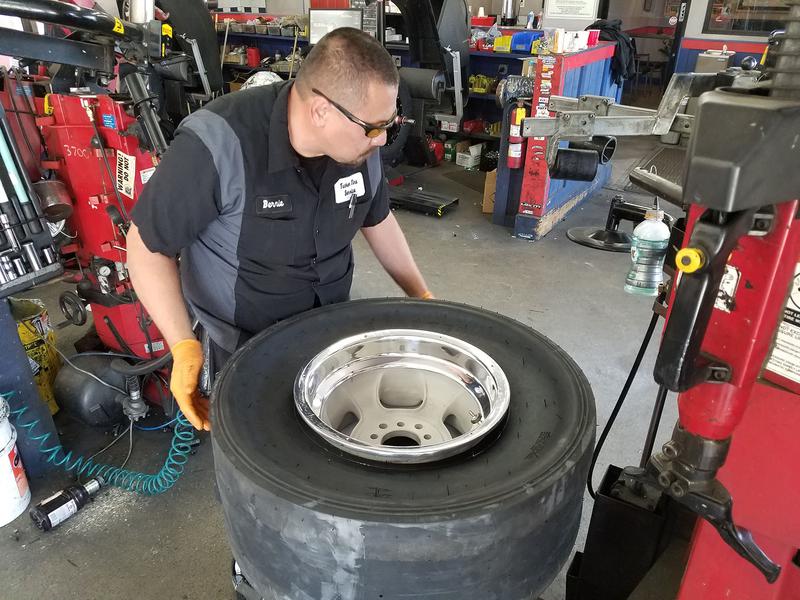


Purchased two M&H MVF004 12-16 Nostalgia tires from JEG'S. Had them mounted down at Tucker Tire who I raced with in the 70's. They take special care of the Magnesium Halibrandts.
Setting the wheels in place so I can measure the hub to hub for the rear end. Next step will be to have the Old's rear end narrowed to 48" after deducting for wheel well and brake rotor spacing.
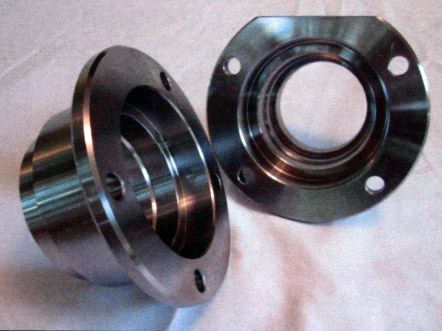
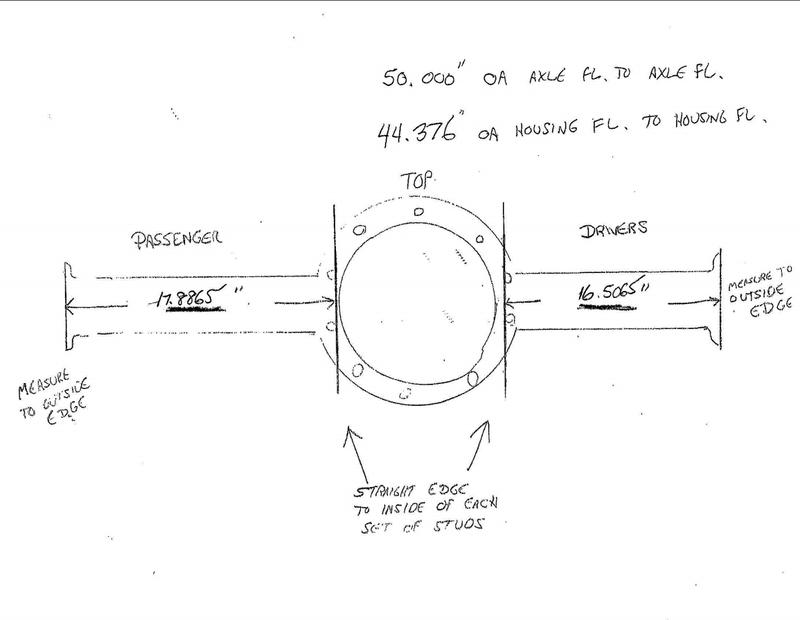
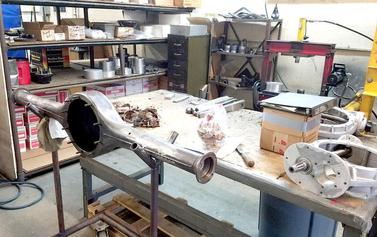
Dave at Fabcraft Metalworks set up the measurements on the rear end (Photo Right) after I gave him the Rear axle housing flange to flange measurements. I also purched a pair of Billet Steel. CNC machined axle tube housings ends. The inside of the rear body from side to side was 70", then calculated the Halibrand wheel offset. I don't have a lot of room between the body and chassis maybe a total of 3 inches on each side, so you don't want to mess it up or you'll be spending a whole lot of money to fix the problem. In that three inches I have to have room for the 1 1/8" rear radis rods.
This week the rear 1963 Pontiac / Olds rear end is being narrowed at Speedway Engineering.
I spoke with Ken Sapper, who had been at the helm of Speedway Engineering for the past 30 years. I met him out at the LA Roadster Show. I explained my situation with the Olds rear end and he was nice enough to work me into their busy schedule. For over 50 years Speedway Engineering has been dedicated to manufacturing precision-built rear ends and chassis components for race cars.
Taken from their website:
Founder Frank Deiny’s dedication to providing racers the best racing equipment quickly became the mission statement of the business, and under his leadership Speedway Engineering became a primary source for racers in the top divisions of NASCAR, ARCA, and many other top stock car racing categories. Performance, reliability and first-class service became the key characteristics of Speedway’s growing product line Throughout the ‘90’s and today, Speedway Engineering has grown under the helm of Ken Sapper, expanding the product line to include an entire list of suspension and drivetrain products: Ford 9” Rear End Housings, Quick Change Differentials, Axles, Sway Bars, Hubs, and a comprehensive line of suspension components.Ken’s experience as a racer and long-standing knowledge of Speedway Engineering (one of the first employees) has enabled Speedway Engineering to continue its position as an industry leader.
Speedway’s success has been a result of its dedication to understanding the racer’s needs and filling those requirements. Speedway Engineering products represent the best in performance and reliability, manufactured to the highest quality standards and serviced by a staff that has the experience and knowledge to make a difference.
At Speedway Engineering, we’re dedicated to performance. We look forward to the opportunity to help you reach the winner’s circle.
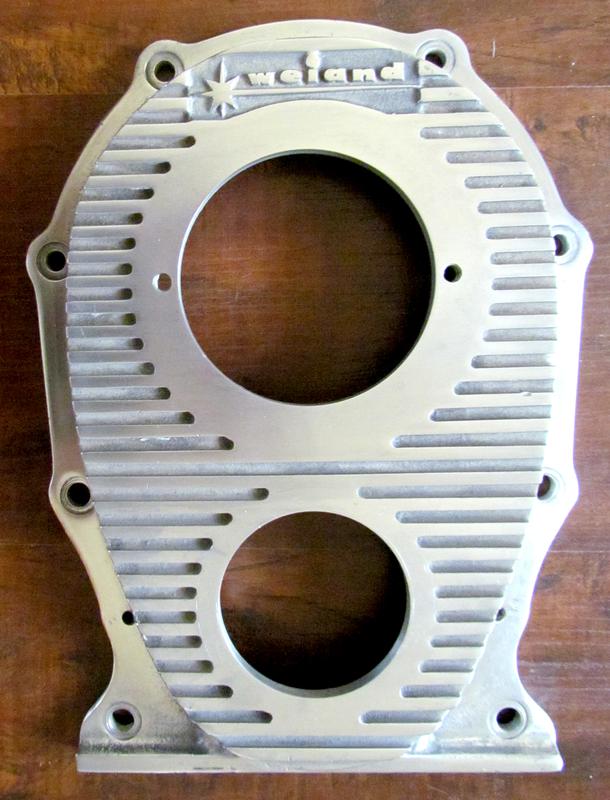
While I'm waiting on the rear-end and chassis to be completed I'm hunting down some of the Weiand parts I need to bring the car back to its original specifications. All these parts are extremely difficult to impossible to locate and once you find them they are not cheap. Here is the 50 year old 426 Hemi Weiand timing gear cover with a Weiand snout which I now have. Later I will send them out for polishing.
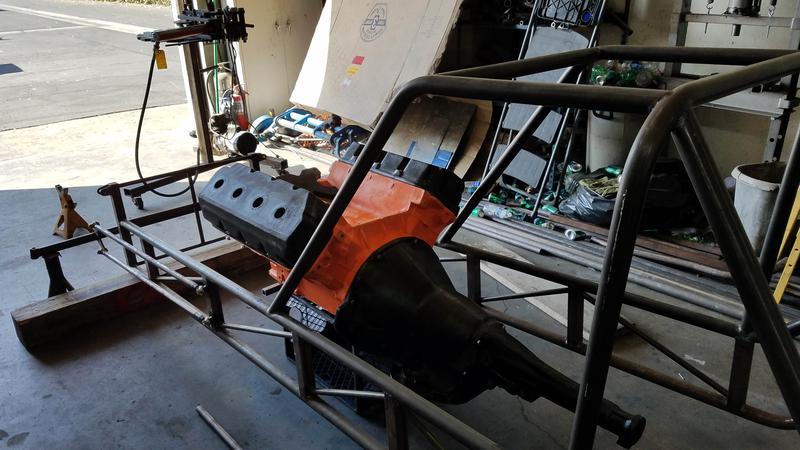
Purchased these yesterday a 426 Hemi and torqueflite 727 mock-up which it will make it easier to set things up because of the weight and size. After the motor and trans mounts are in I will then retire these to my office or sell them.
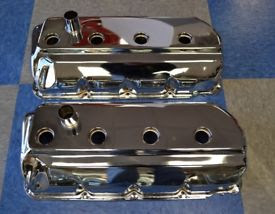
Purchased the chrome 426 Hemi valve covers just like on the ones on original car.

Spent the day over at N8Z FAB shop helping get the front end correctly set up with the proper caster on the axle which now set at 7 degrees. By the end of the day the front-end was fabricated and welded, now onto the rear-end. Should have the narrowed rear-end housing back from Speedway Engineering by next Thursday or Friday.
Project last updated on 08/06/2022 at bottom of this page.

Left: 8/17/18 Speedway Engineering was extremely busy building some NASCAR rear-ends and my job got put off for about 3 weeks. The wait was well worth the results as you can see. Outside housing measurements are from side to side 43 inches. I’m now waiting for the new Moser Axles to be made shipped, should have them next week.
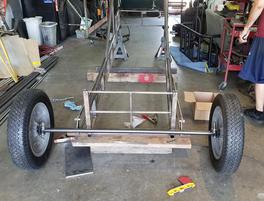
I ordered the rear-end components and tubing yesterday to mount the new rear-end to the chassis. Next week I'll have the rear-end mounted in the chassis. At that point we’ll finally have a rolling chassis.
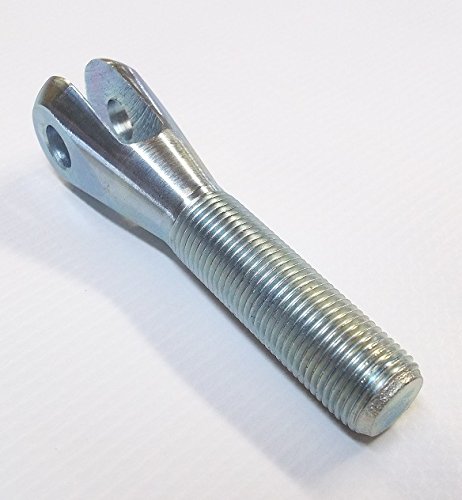
Photo #1 - 4 of QSC CR6-10 3/8 Hole X 3/8 Slot X 5/8-18 RH Clevis.
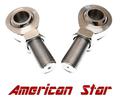
Photo #2 - American Star CMR10 5/8 x 5/8-18 RH Thread Male Heim Joint (Set of 2 with Jam Nuts)
Photo # 3- 6, 5/8-18 RH Weld In Threaded Heim Joint Tube Adapter Bung for 1" Dia by .083 Wall Tube.


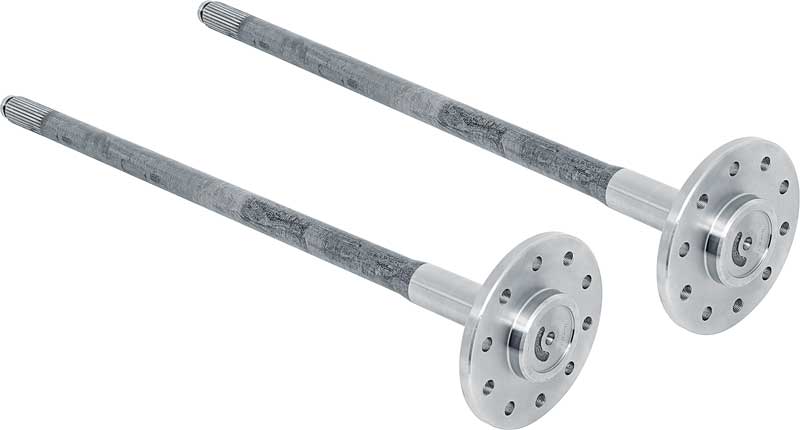
The custom-built axles came in from Moser with 5/8 screw in studs and set up for disc brakes.
Brackets sitting on rear-end housing making sure all parts fit properly before taking it over to the chassis shop. I measured completed rear-end for inside and outside tire to chassis and body clearances. Looks good to go.
No matter how many times you measure and calculate everything, it’s only when the completed set-up is finished, and measure do you feel relieved that you did things correctly.


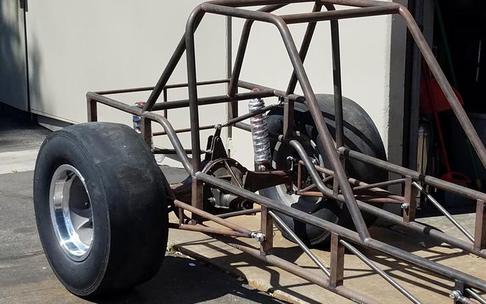
In the chassis shop today working on the installation of the rear-end. Using the mock-up engine, we set the correct engine height and angle. This allowed us to set the shocks at the proper height and the correct pinion angle. We will have some adjustability to the angle if needed. I do have a couple issues I have to research and resolve. More on that later.
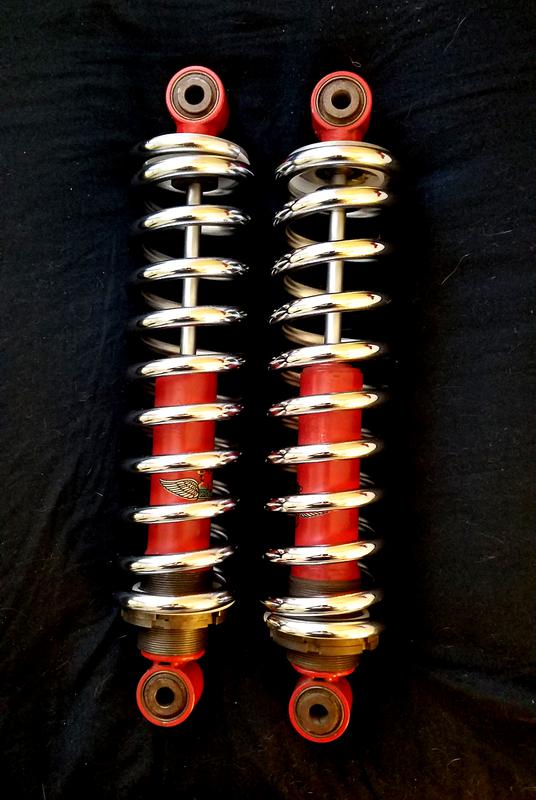
Left: Just purchased a set of NOS Koni Coilover Shocks 80T 2090 dated 6/1970 Heavy Duty. These will be installed on the rear-end this week. These are just like the front ones 80T 2091. Reveived these new chrome springs from Speedway Motors.
It has been difficult and a slow process finding the correct parts for the car but it will be an axact recreation of the chassis down to its smallest item.
Left: Adding center down tube.
Center: Brackets welded on rear-end housing and grinding to make it look great.
Next week we should have rear shocks mounted to new crossmember with watts linkage from the frame to rear end, half round frame mounts for lap belt,
Panhard from front axle to frame. At that point we will put the wheels on the chassis bring over the body and check for fit and design the new body mount to rear of chassis. We will also be able to check for chassis measurements for tube where the steering and bake mount to. At this point well be about 95% done with the chassis.
Tom West / Lou Hart Photo.
Orange County International Raceway
Tom West / Lou Hart Photo.
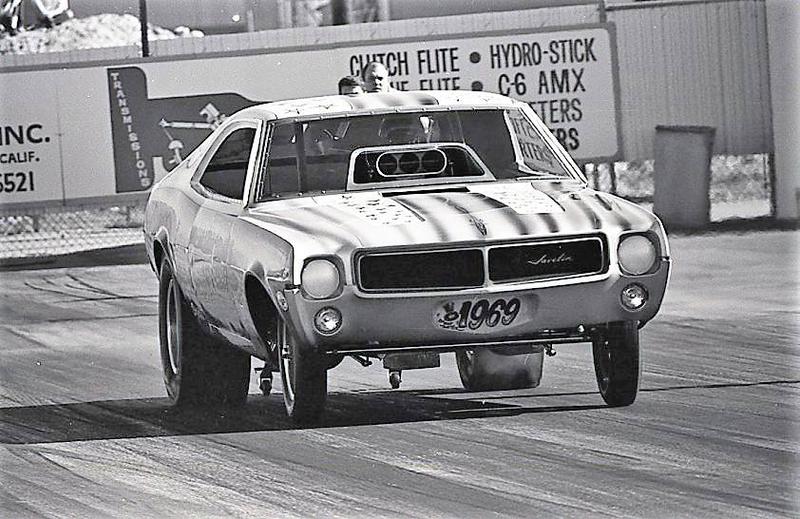
Irwindale Raceway first outing Jan 1969
Tom West / Lou Hart Photo.
Irwindale Raceway first outing Jan 1969
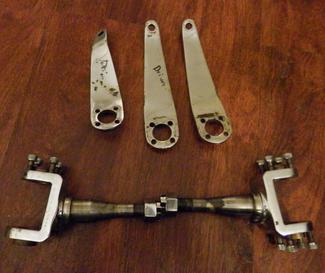
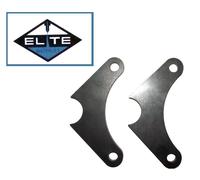
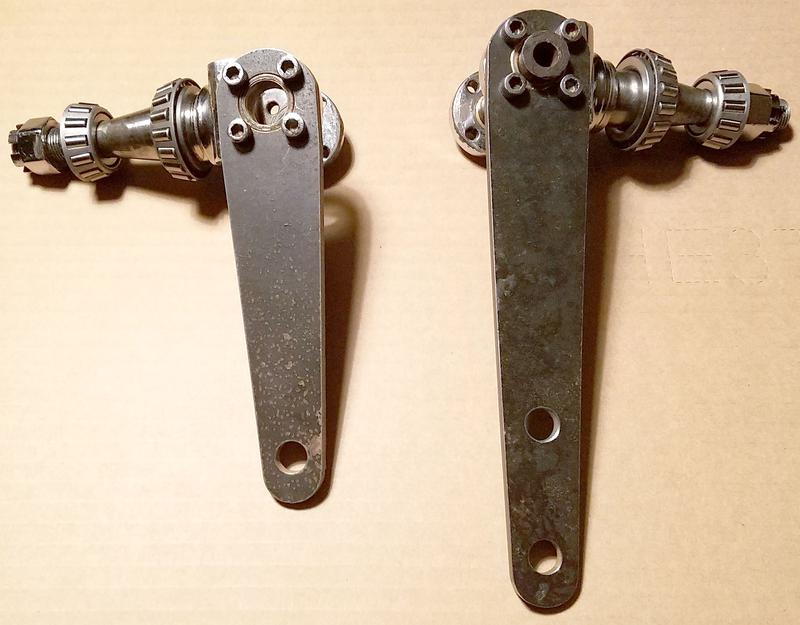
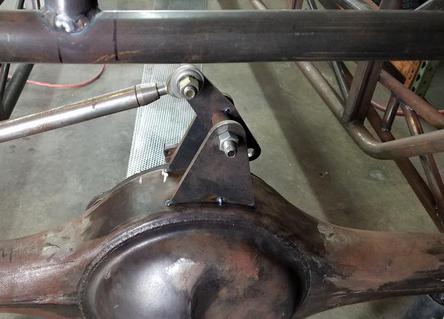
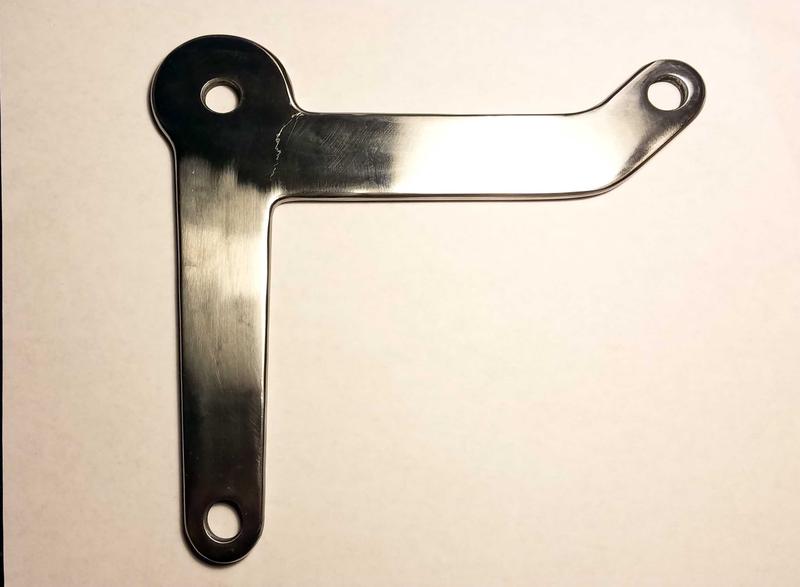
Left: As you can see in image (A) these are the stock nostalgia P&S spindles and steering arms. They were made for a different chassis configuration and the arms would not work for my chassis design. I tried purchasing after-market arms and those didn’t look correct at all. I decided to design and build (B) new ones just like the nostalgia ones but flat (no twists in them) and with an extra hole on the right-side arm for the cross steering to connect to. These arms were cut at Elitewater jet in Santa Ana California. They also cut out the bat-wings for the front Axle a while back.
A
B
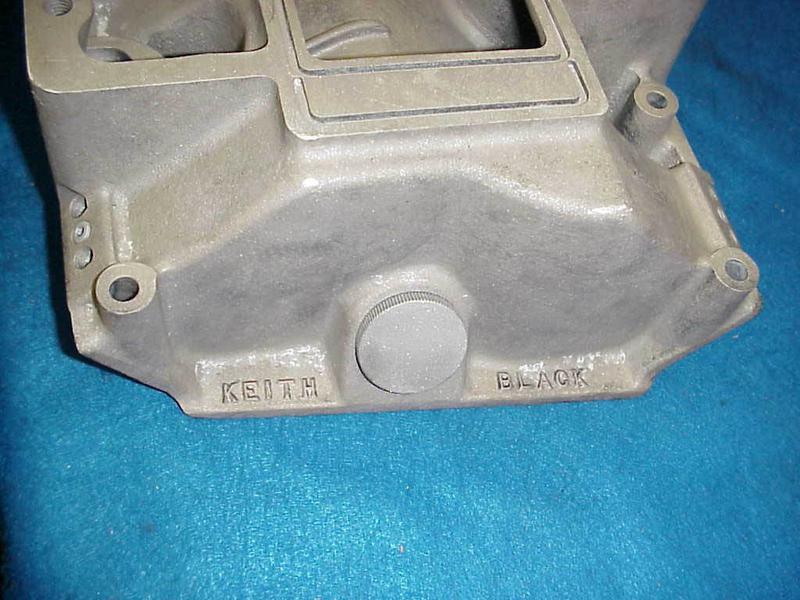
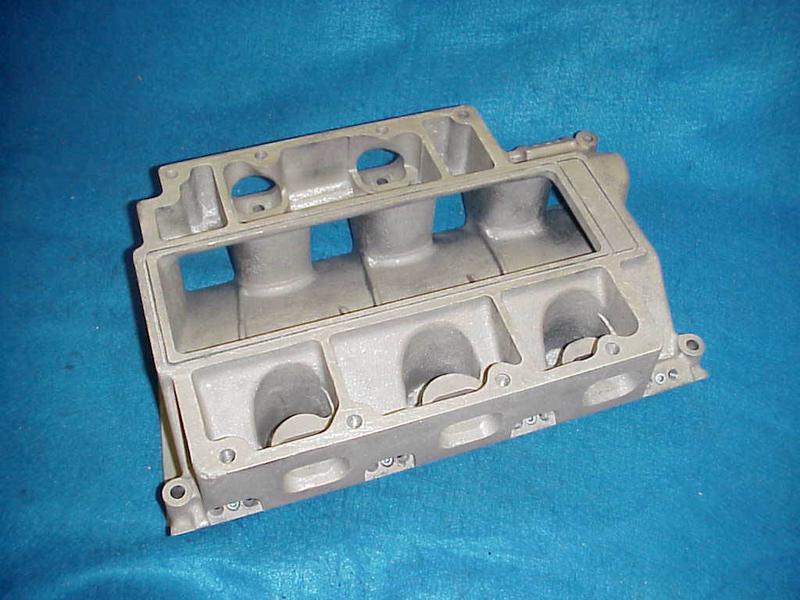
Just purchased a vintage Keith Black magnesium blower intake manifold (Z20A3) for the 426 fuel Hemi. I wll have photos of it with the blower and injector later.
Had three more pices waterjeted for the rear-end Watts linkage. By the end of next week we'll be ready to put the body on the chassis and make the brackets for the rear body mount.
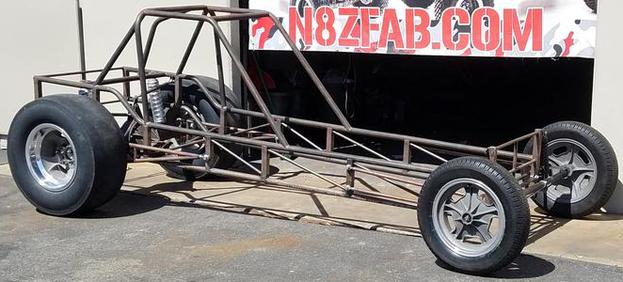
First day of the rolling chassis.
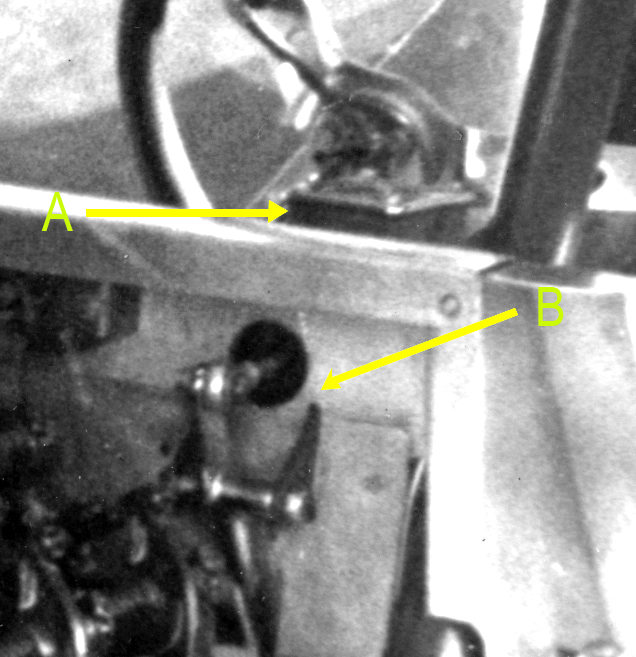
Chassis mostly complete as a roller, still needs a couple of cross members and steering and brake cross piece installed along with the hardware. Matched up photographs with original and new chassis and is close to perfect. Better to original then after the Chevy replaced the Hemi and other items such as braking system was moved from pedal to hand brake and so on.
Rear end and watts linkage finished and looking great. Even small details such as how the bottom radis bar is welded to the top bar is correct. Small details are important.
Now that the chassis main section has been welded up, it time to put in the cross chassis front roll bar tube, steering box and brake assembly in the chassis. I was also looking for someone to do the waterjet for the two-rear body to chassis mounts and the bell crank. In my search I came across a Nostalgias race car builder by the name of Don Ross out of Texas. He agreed to cut the two brackets and my bell crank for me. As we were speaking, I told him about the steering and brake parts I needed. I sent him photographs of the pieces and he made several drawing. In short he is now making those brackets for me along with the others.
We were talking about the photos of the steering mount and I said, I think that they use a P&S steering box. I had purchased a Ross box because I thought at the time that looking at the photo that was the box that they used. Don looked at the original bracket from the photo and said it was set up for the P&S box. I asked him if he knew of anyone who had one. He said, he had one he was going to sell to a guy in Australia, but the guy hadn't been herd of for quite awhile and agreed to sell it to me. Below are the drawing of the rear body chassis mount, bell crank, steering box mount and will have the drawing for the brake master cylinder bracket soon. He also have the correct brake pedal arm that I needed.

Body Chassis mount
one for each side
Bell Crank
Don Ross design for Scrima chassis.
S&P Steering box assembly
New Bell Crank installed
Bell Crank on original chassis
Steering bracket
Don Ross design for Scrima chassis.
Cross-tube. The slot in the bracket
will slip over the tube.
The brackets will be welded to the two back uprights at the end of the chassis.

S&P Steering box
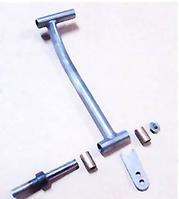
Don Ross Brake arm and pedal
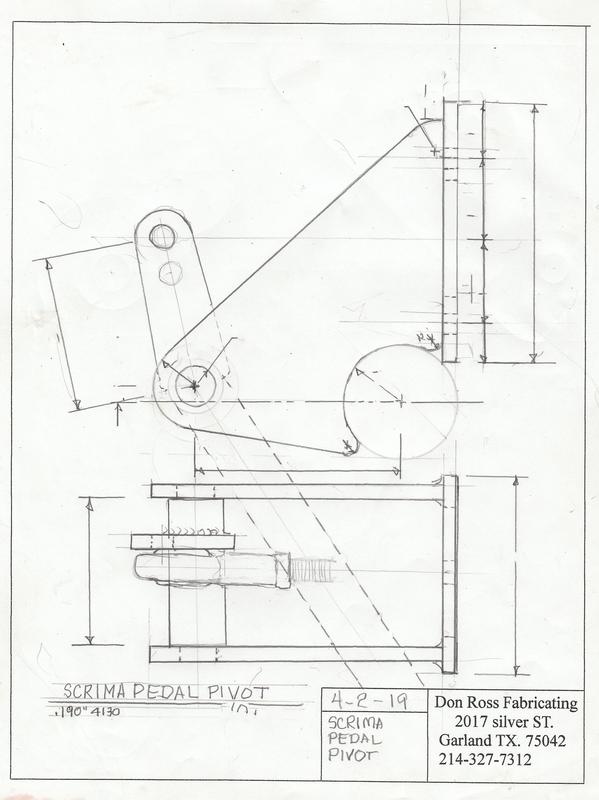
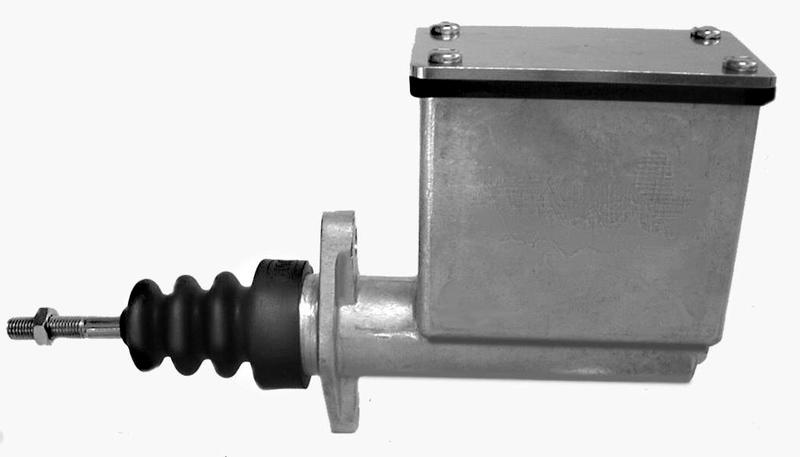
Original design rectangle top master cylinder illustration A Reverse Master Cylinder designed from original illustration B
Above the finished axel with panhard bar completed and lower shock mounting hole welded in.
Above the original chassis and shock mounts
Thanks To:
Fiberglass Trends
Fiberglass Trends was the company that laid the glass for many types of bodies including The Javelin. My Trends body is the only Fiberglass Trend Javelin body known to have survived. Most of the crashed and the bodies were destroyed
Racing Eng. Service
Trying to find information on them still digging.
Arcadia Transmissions (Art Carr)
Story below.
Ken Elle
Investigating
Tri - Form
Tri-Form Safty Equeptment. They supplied the parachute ans some equipment.
Competion Engeering
Competition Engeering (Ron Screma) Chassis who built the car.
Art Car Story.
On the side of the car was written Arcadia Transmission and the other photo from the other side said Art Carr, which is it? Here the answer. Yesterday I looked up Art Car who is still with us. He has a shop in Huntington Beach called California Performance Transmission. It’s located at 5502 Engineer Dr. Huntington Beach, CA 92649. His contact phone number is 714-901-3784.
After locating the shop, it was only a short drive there from my house. I walked in the door and the receptionist had walked out for a minute, I guess. I looked in one of the offices directly off the entrance. Sitting behind the desk was legendary Art Carr still at the helm of his organization. I peeked in the door and Art looked up. I introduced myself and he said come in and sit down.
I explained to him that my car had run one of his 727 Torqueflites transmissions and his name was on the side of the Carr. I showed him the photos and told him what I needed, and he said that he would build the trans for the car. He made suggestions and added that I should run one of his Torque converters, a 11 inch with 2,500 mph stall. So be it I now have on order a trans that was built by the same person who built the original.
Seems we know a lot of the same people and both of us ran out at Irwindale, Orange County International and Lions Drag strip in the 60’s and 70’s. We talked about old times and had a few laughs about eating In-N-Out burgers at Irwindale, In-N-Out owned part ownership of the track. He told me the story of him Winning the Winternationals in 1962 with his 1961 Ford Starliner and showed me the massive four-foot trophy. I spent around a half hour with him and could have listened to hours of stories.
New Bell Crank
New Steering Bracket
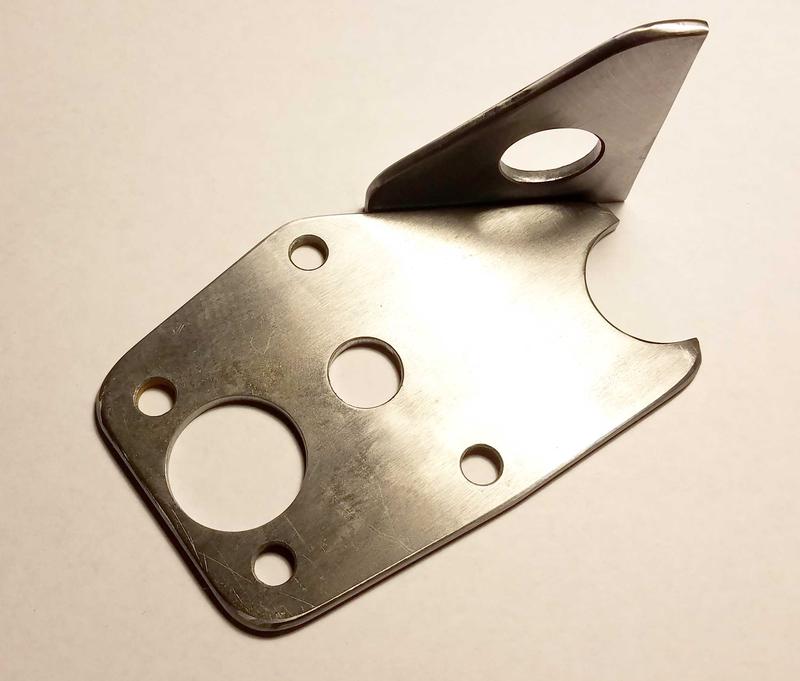
Original Steering Bracket
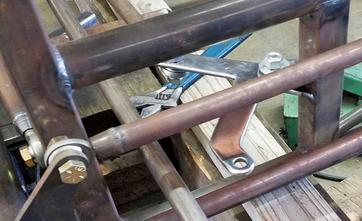
Welding in new Steering Bracket
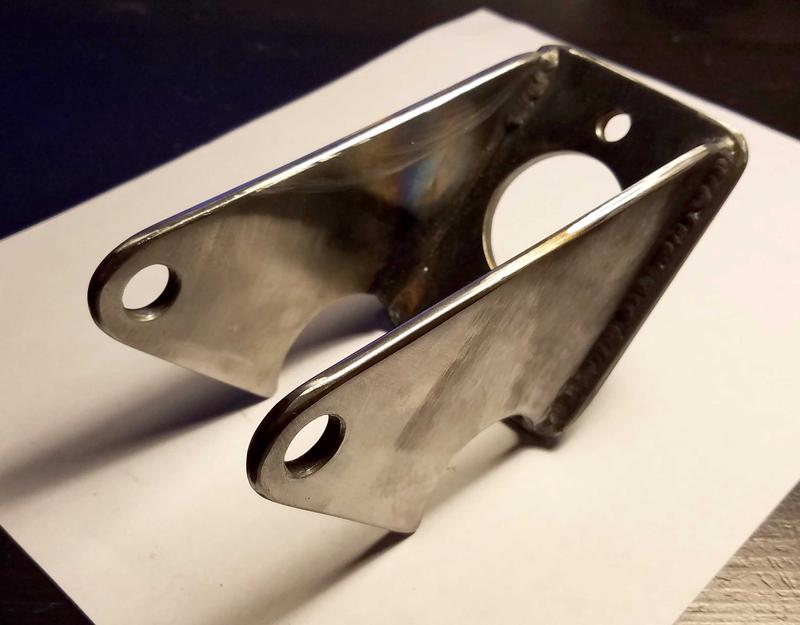
Brake bracket Don Ross design for Scrima chassis.
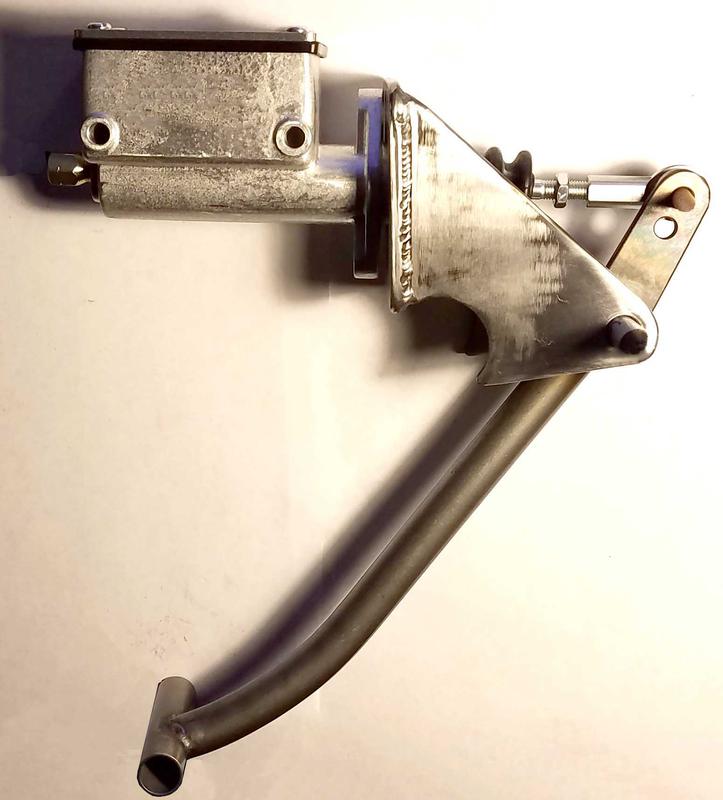
New brake bracket that has pedal and master cylinder
New rectangler top master cylinder
Brake System
Steering System
Installation of the body mounts to the chassis. The first time in 35 years that the body is sitting on its own chassis. The chassis fits like a glove. An exact duplicate of the original chassis down to its smallest component. The body will sit two inches lower when the motor and trans are installed because of the additional 1000 pounds.


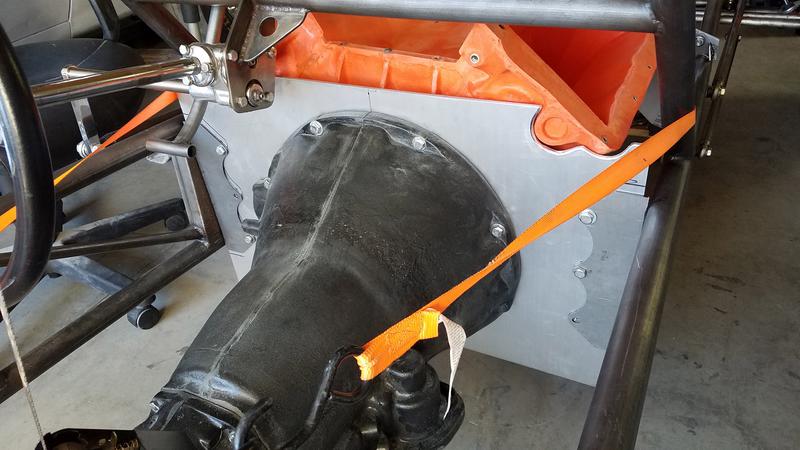
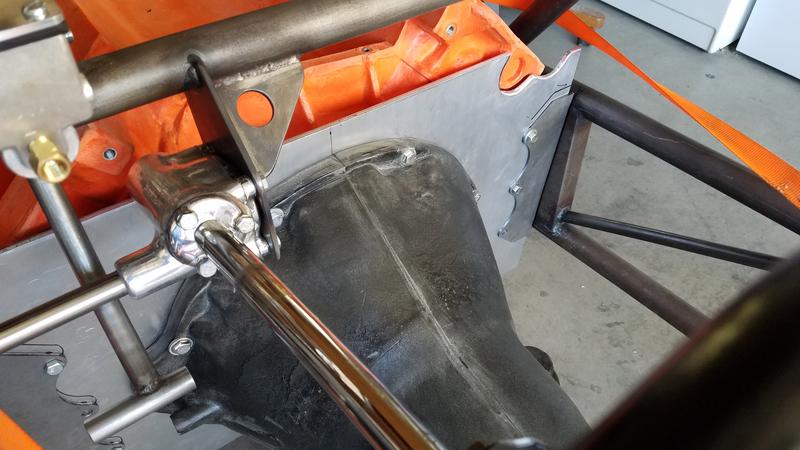
Chassis is back home and motor mounts have been made fot the front just like the original. This week-end I'll be installing the mid-engine plate.
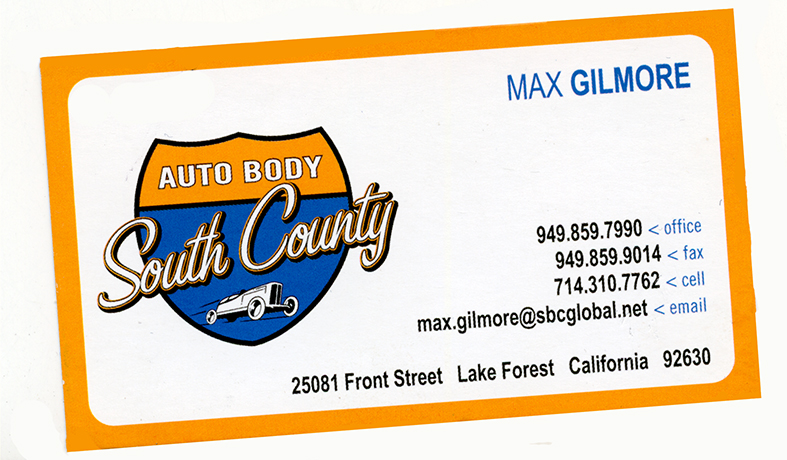
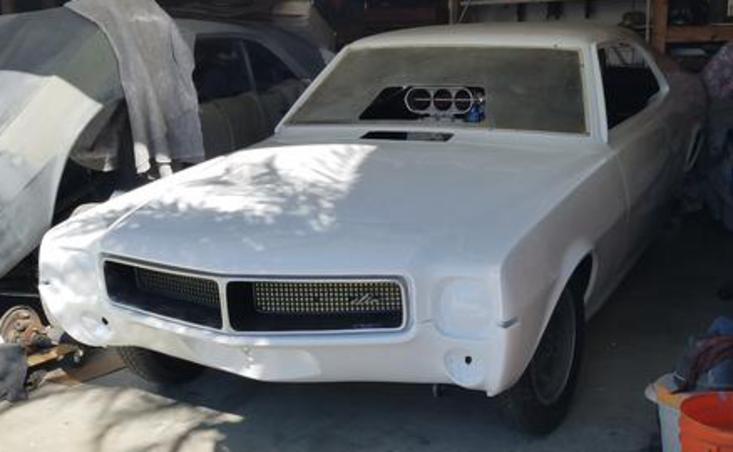
Just as I finished up on the motor mounts the car was put on a hauler and sent to South County Auto Body and in the hands of my friend Max Gilmore. He will be sending photos of the work. First comes a little bodywork, I didn't have time to do, then the first coat of white paint over the whole body. Afterwards the tangerine/orange candy sides will be sprayed.
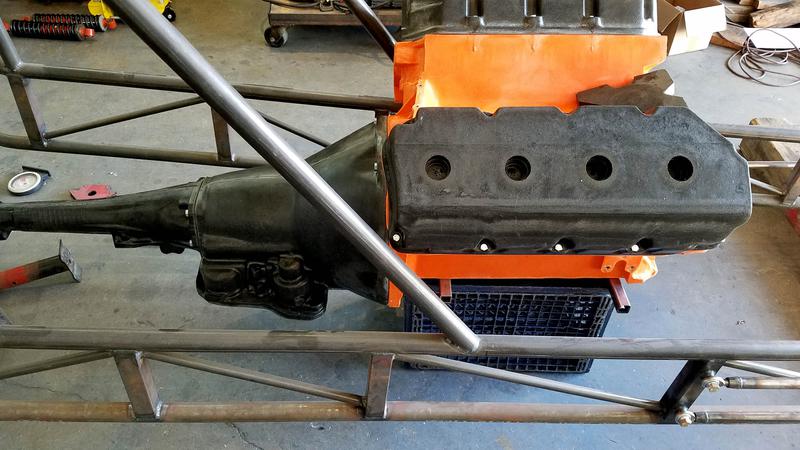
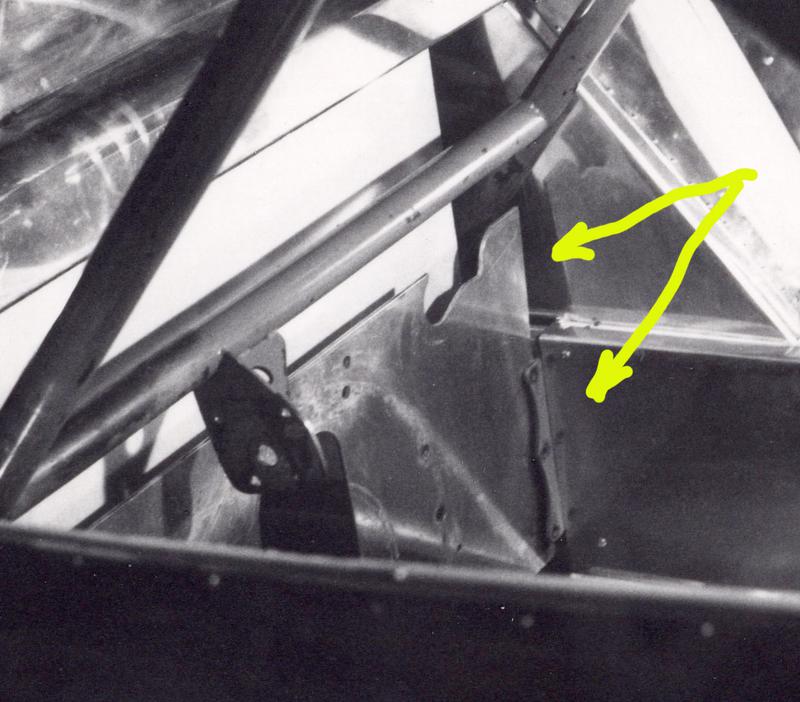
Checking clearences. You can see the cut-out on the plate to fit the head just as the original car had. The black and white original chassis photo shows you how it was.
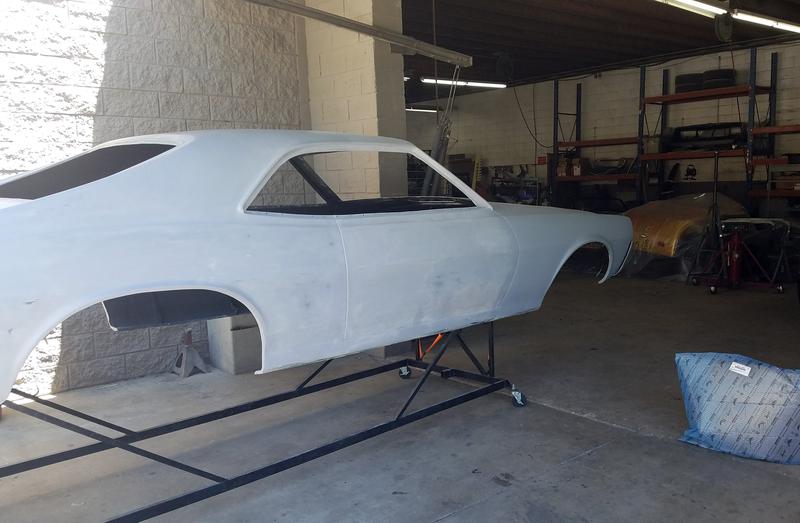
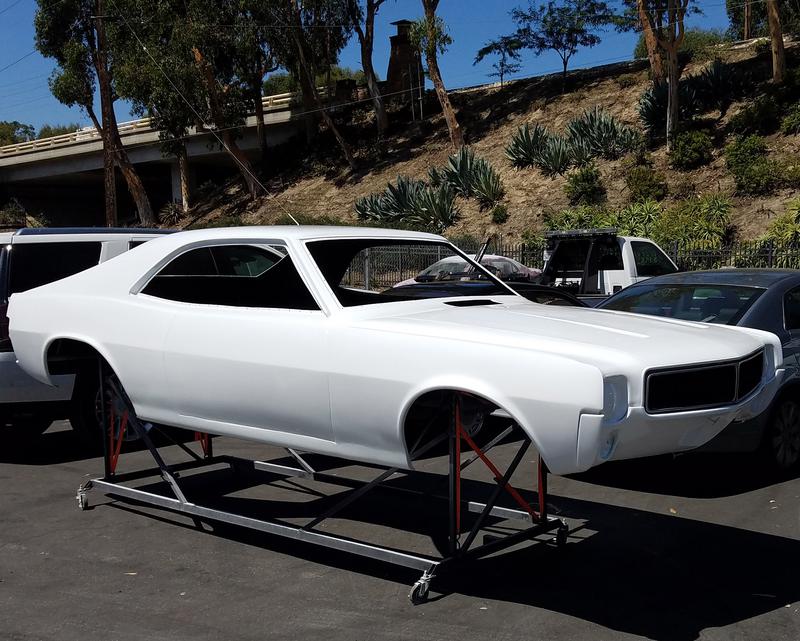
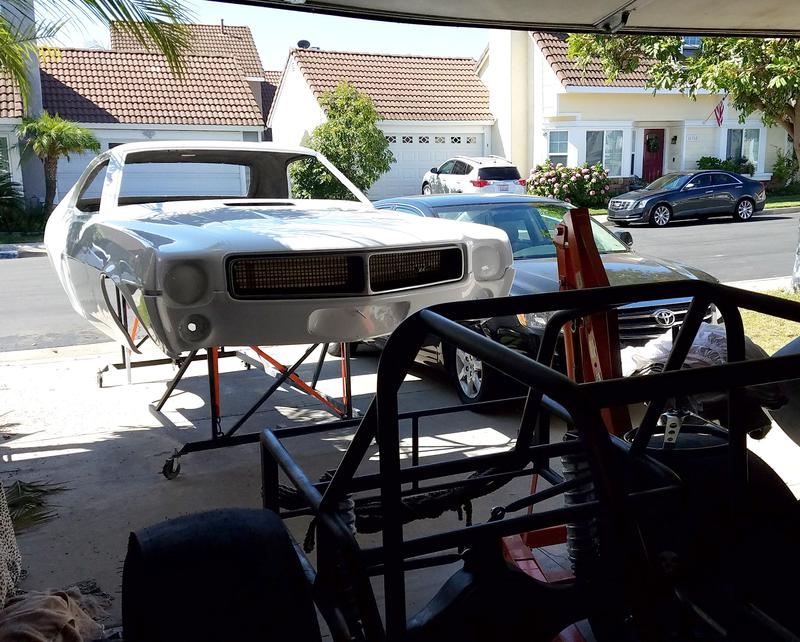
Right: Body painted with base color before other colors are applied. Basic bright white with 3 coates of clear. Letting it cure for a frw weeks at home.
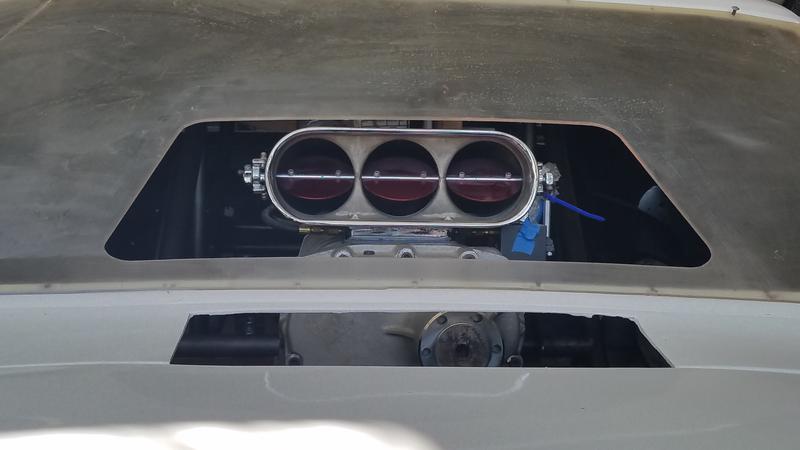

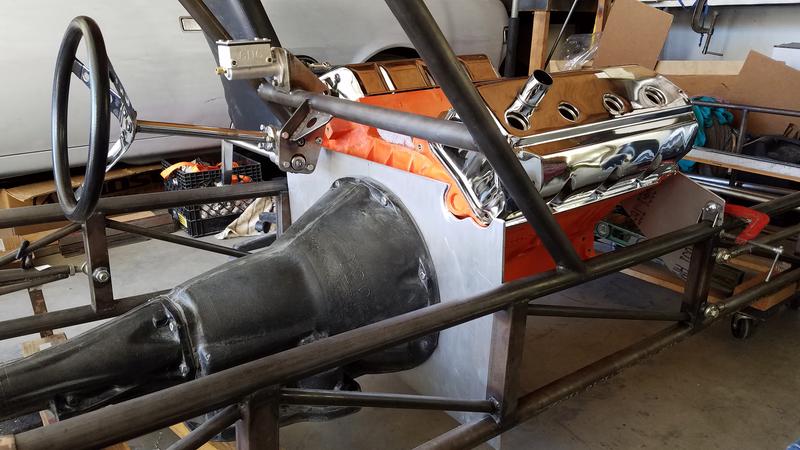
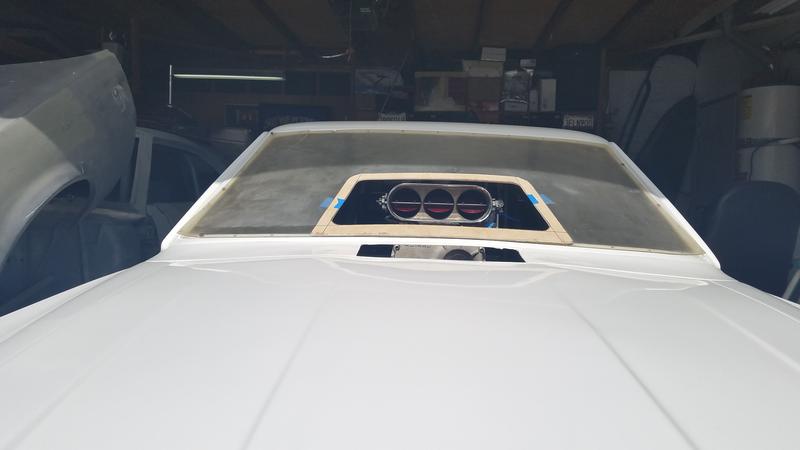
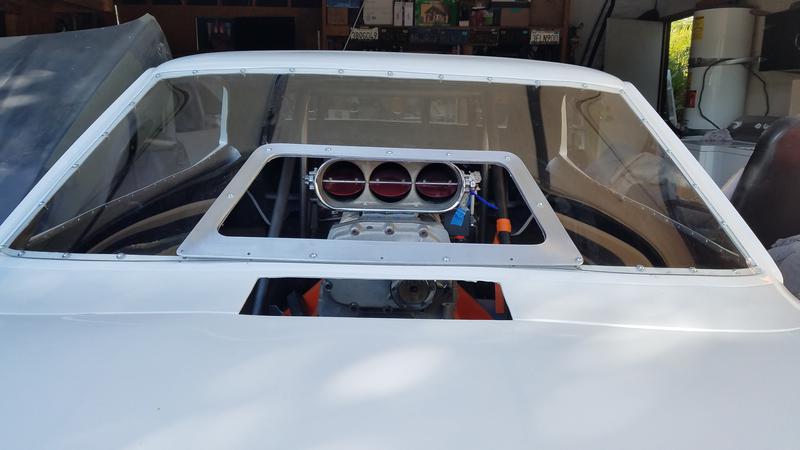
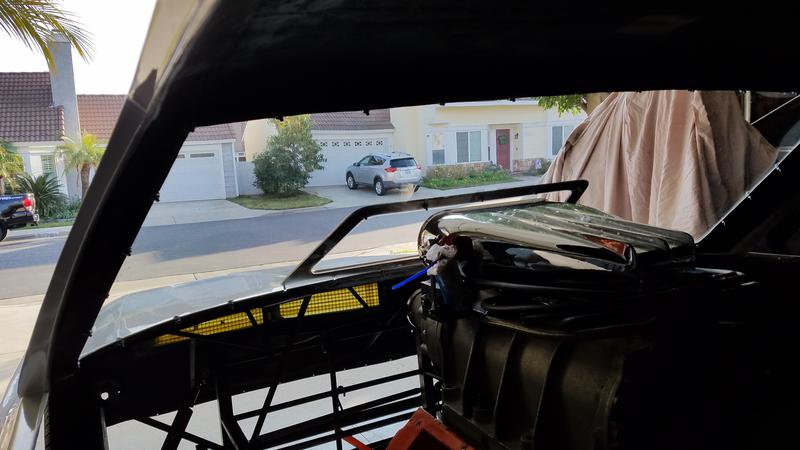
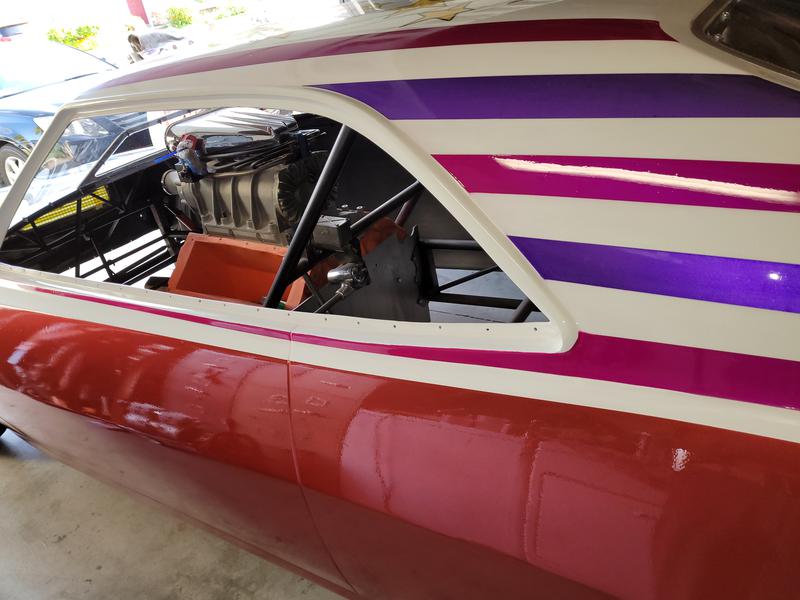
Installed the Cragar Blower manifold on the mockup motor and sat the blower and injector to make sure everything was sitting properly. As you can see we're ready to make the front windshield opening aluminum piece and then the Tins for the dog house and back to the dash.
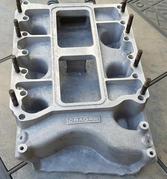
Left: blower manifolds on the left Keith Black on top and Cragar at bottom. I'll be using the Cragar it New old stock as is the blower, lucky to find them both.
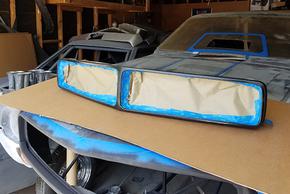
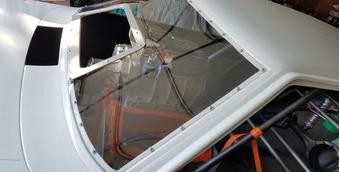
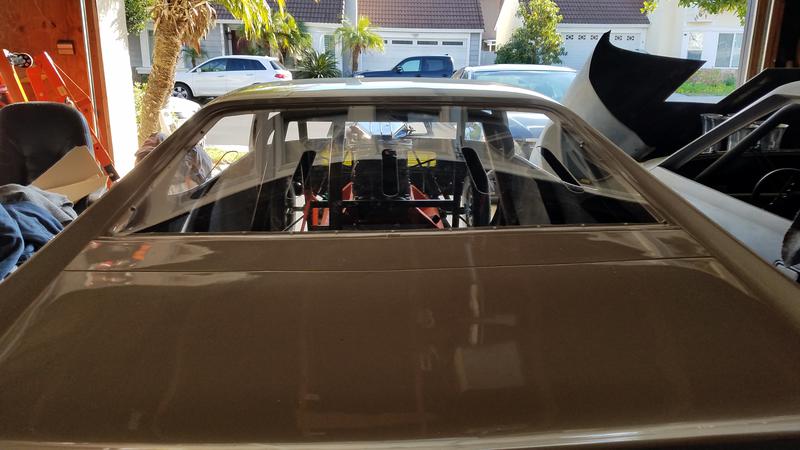
New Lexan windows for the car. I also used my plywood templet to make my aluminum front window injector opening. This took more time to make then putting the windows in. Below you can see the rear window has five slots in it just like the original car had.
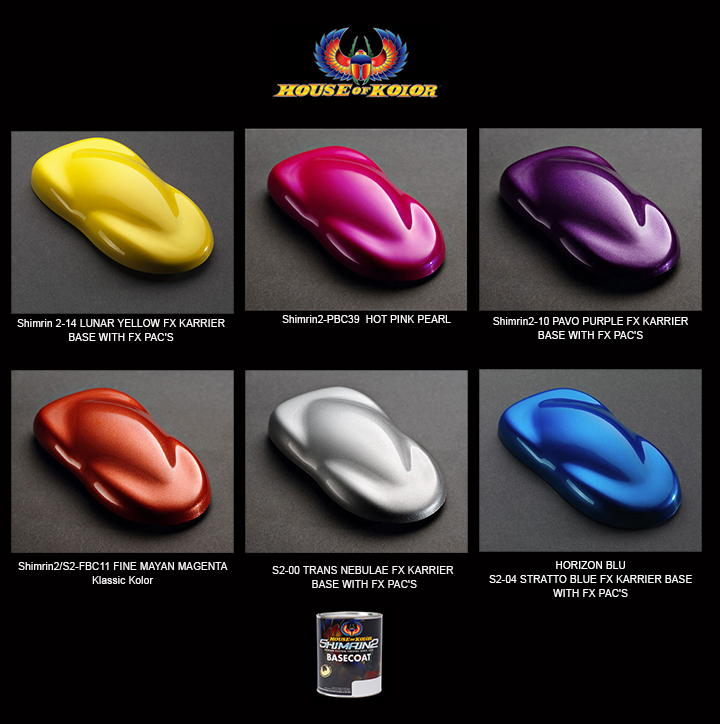
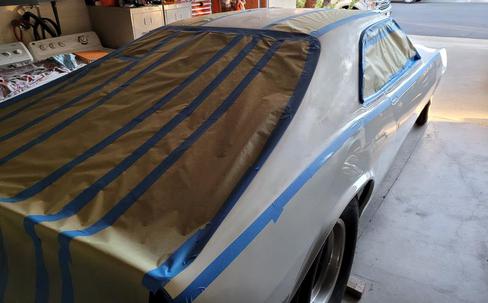
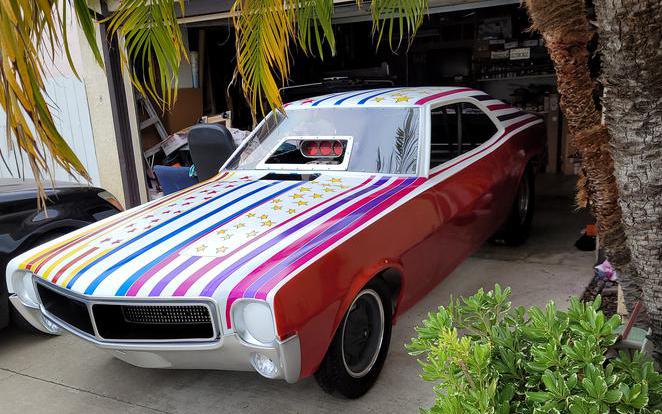
I spent a lot of time compairing all the color photos I have to get the correct colors. Taking in account brightness and time of day the photos were shot. Also you have to look at if the photos to see explosure of by time faded both the car and the photos.
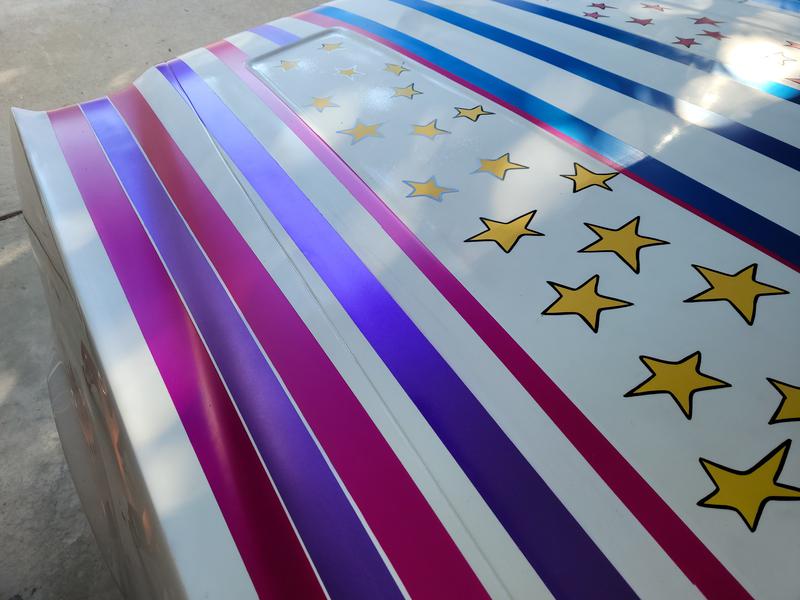
These are the Pearl paint colors I picked and look like the original.


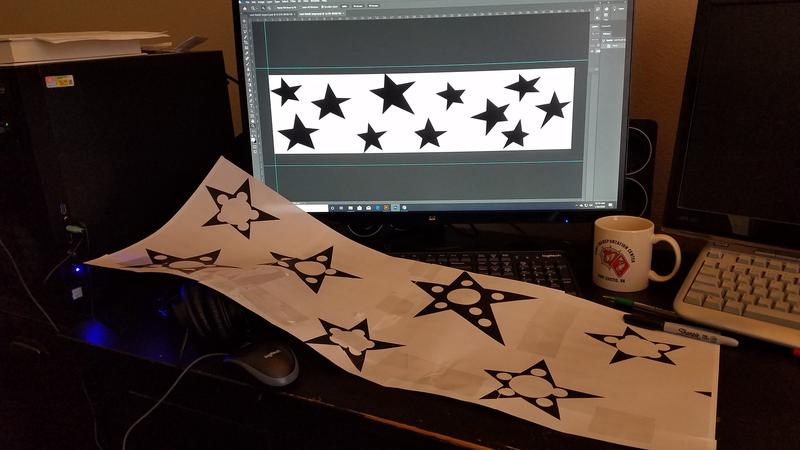
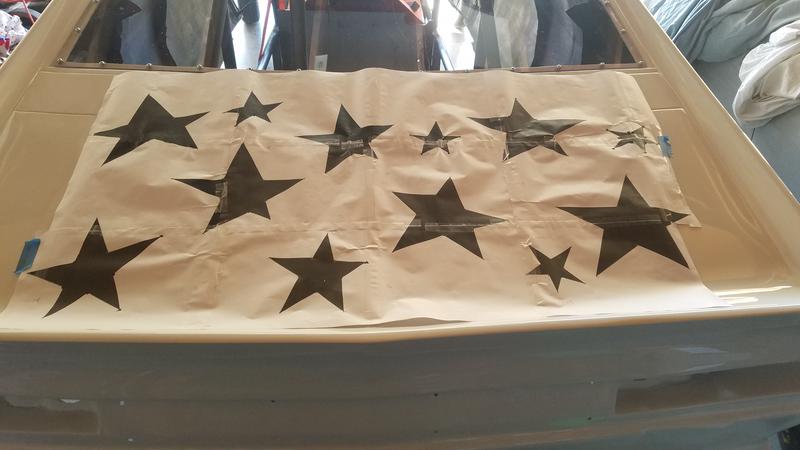
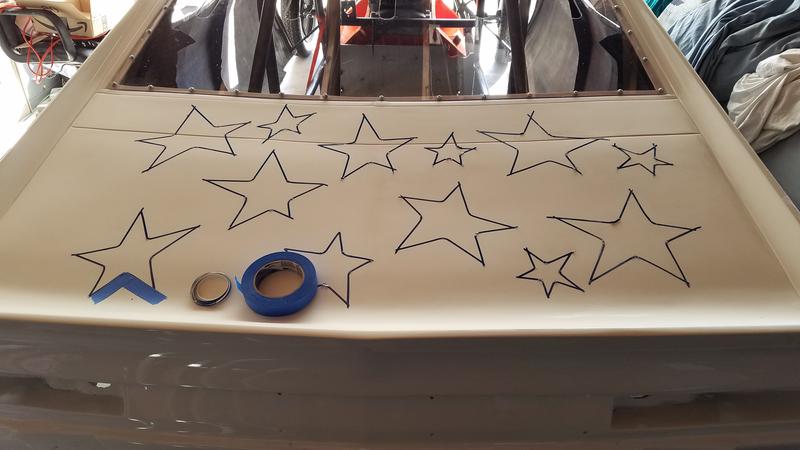

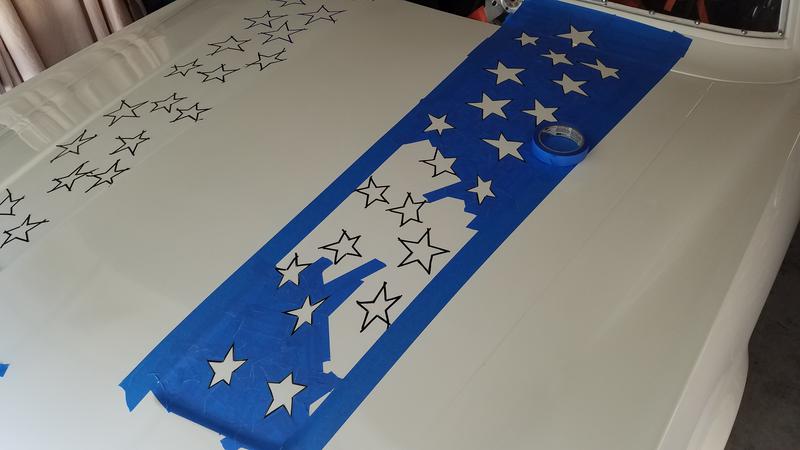
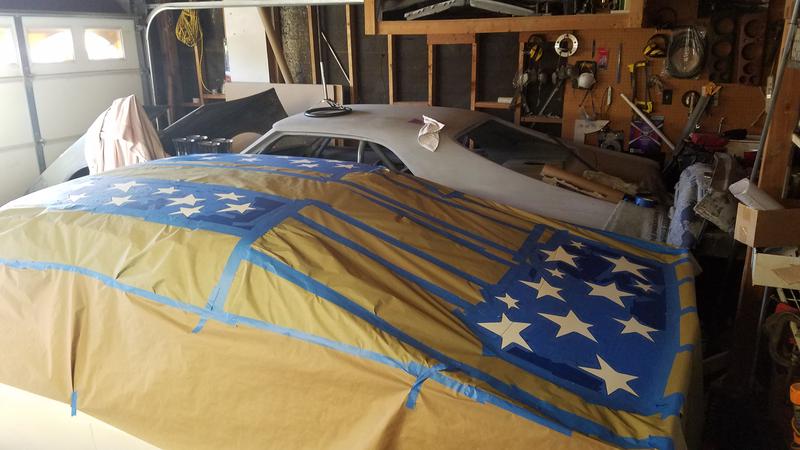
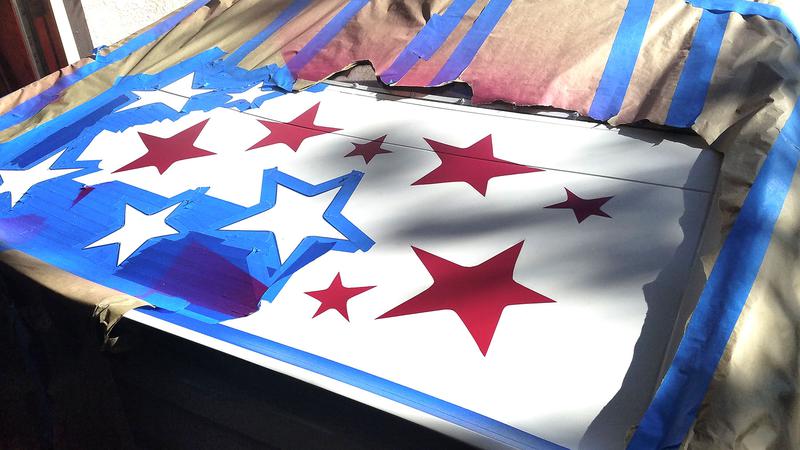
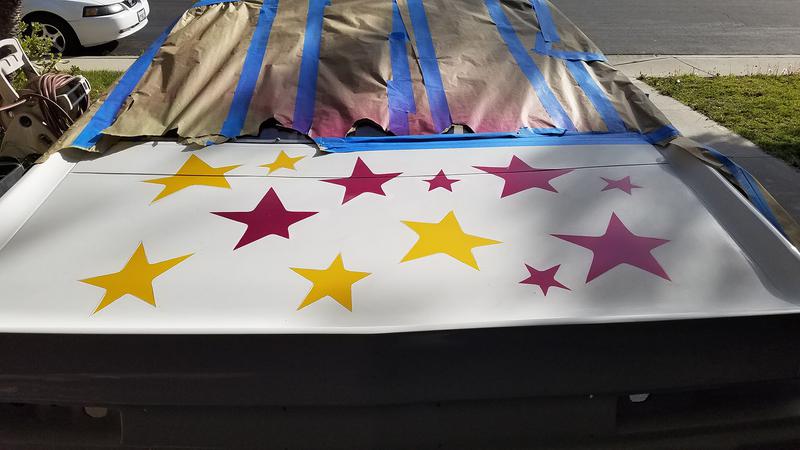
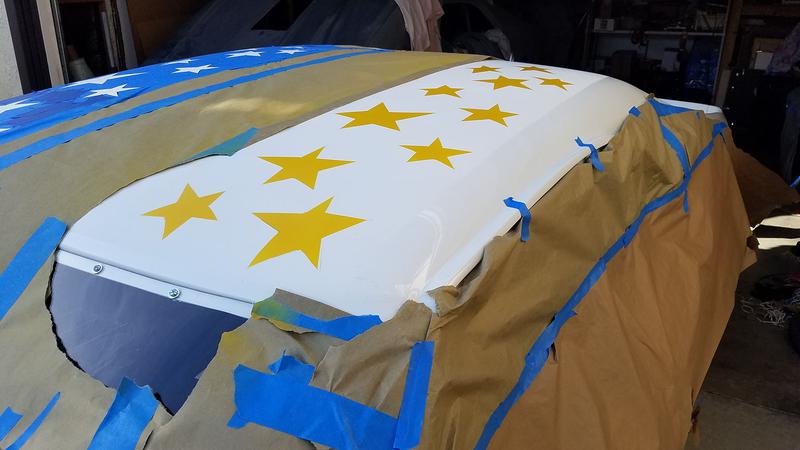
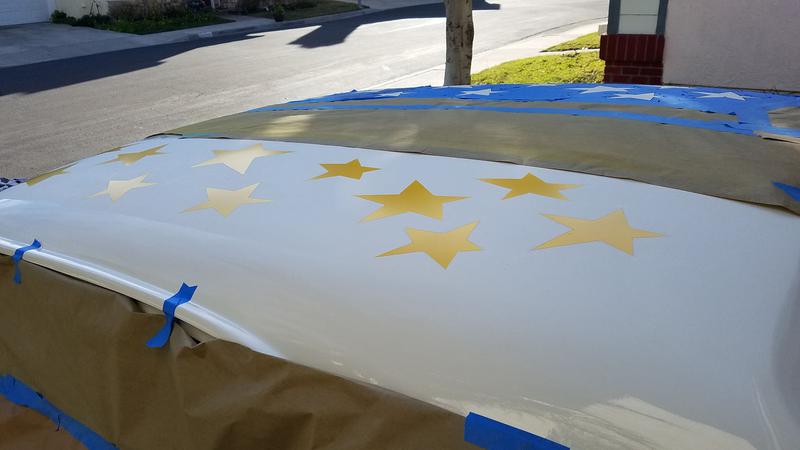
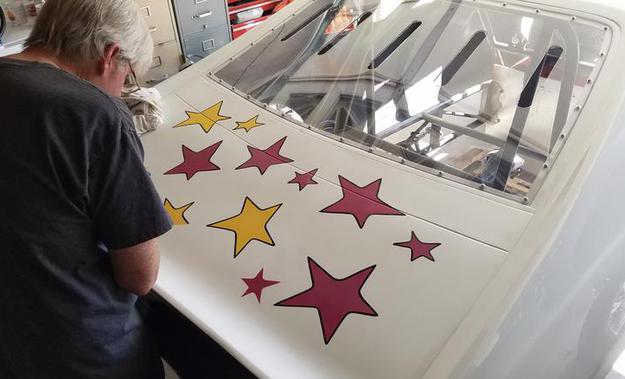
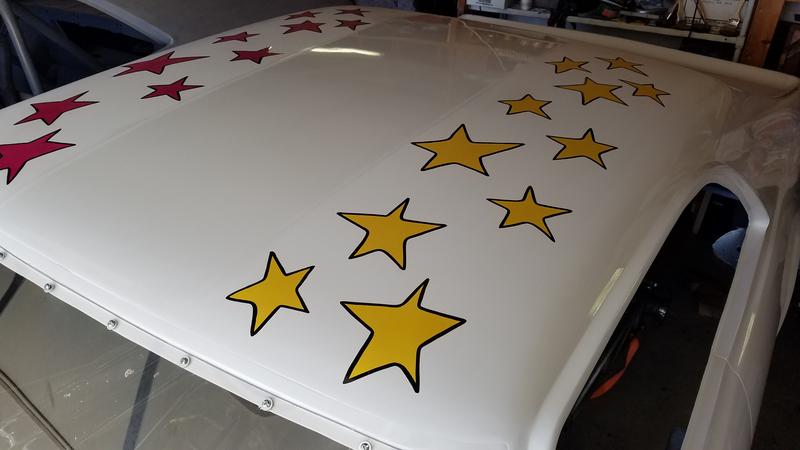
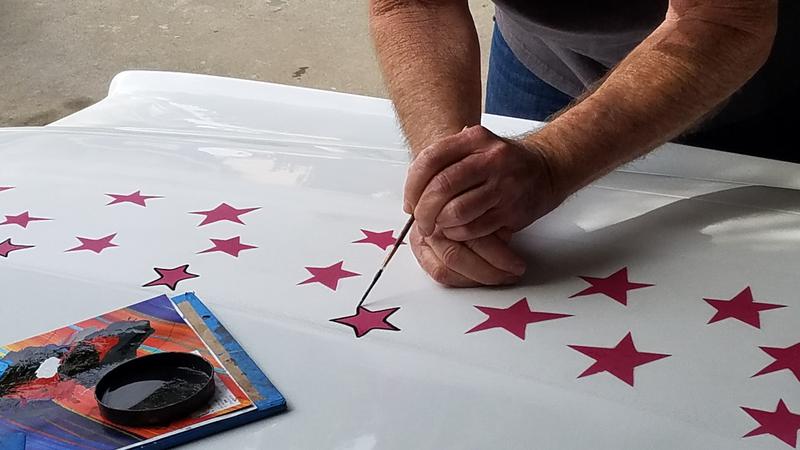
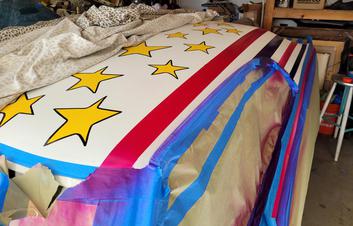
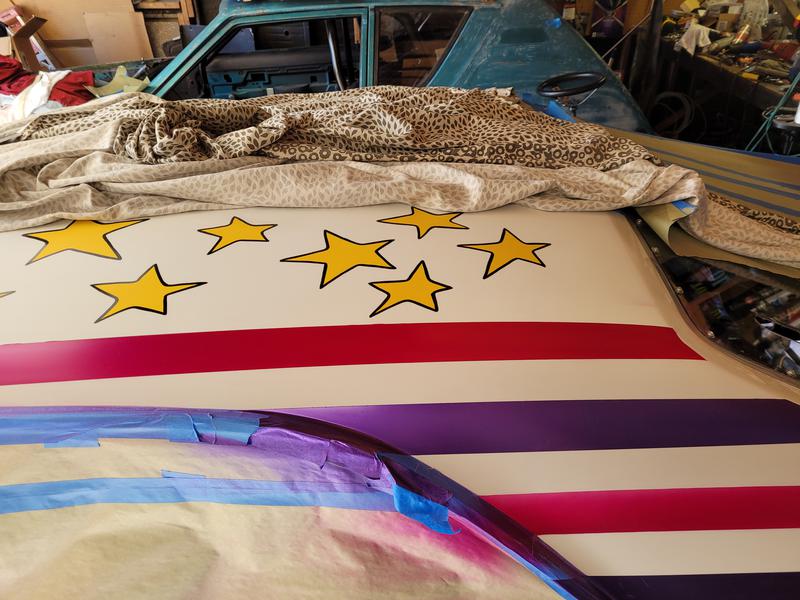
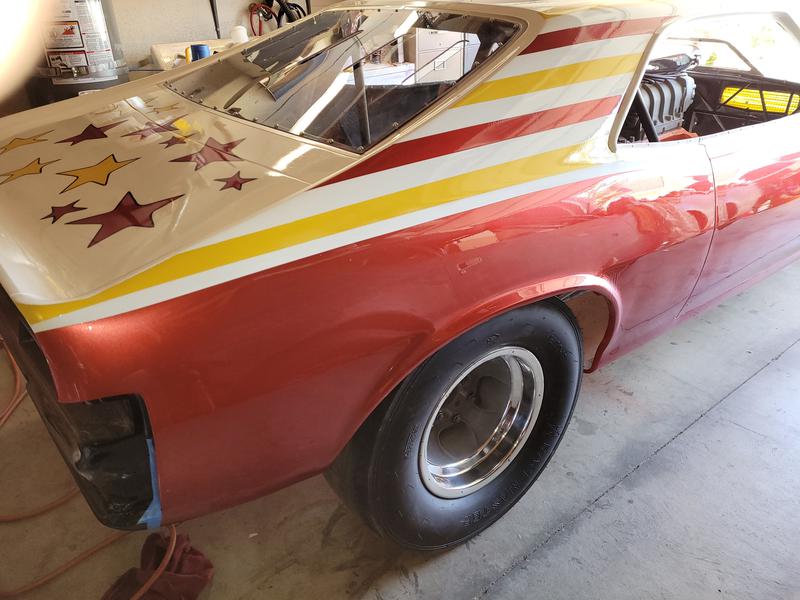
The process of duplicating the stars on the car is a very time-consuming process but to hard to do. First, I had to find the best color photos I had Top Left) and then copy the into my computer (top Right). At that point I put them into photoshop and changed the perfective so I could have a flat templet made to the size I needed (Top Center). I printed the templet out on 8.5 10 printer paper then taped them together as you can see in the middle photo. Placed it on the trunk of the car and used tracing paper to transfer it to the car. I then used 1/8-inch pinstriping tape and went around each star. At that point I used 1-inch easy release masking tape to cover one half of the width of the pinstriping tape and filled in the areas around the design. Forgot to mention that I used 320 grit sand paper to prep the service of the trunk area so the paint will adhere to body. The bottom center and right photos are the hood and roof as I used the same process as the trunk. Next I will show you how I painted the stars.
Don Q has been a Paint Pinstriper in Orange County for over 30 years! He specialize in hand painted brush pinstriping and lettering. Located in Costa Mesa California at Don Q Studio 1835 Whittier Ave D-3 Costa Mesa, CA 92627 donqstudio@gmail.com 949-633-1311
Donut shop, two Disneyland and California Adventure building signs, pickup truck are just a sampling of Don's work. He will also be doing the strips and lettering on the Javelin.

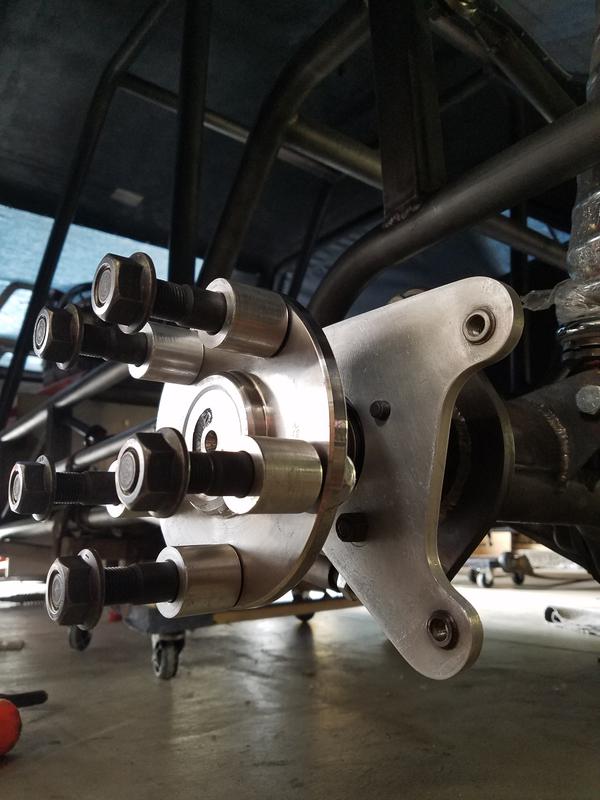
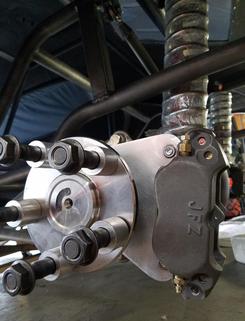
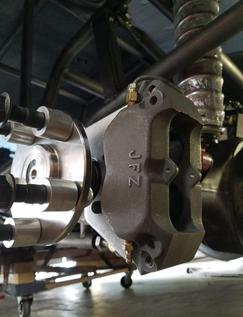
It's been a while since I have worked on the car. I'm finishing the brake system currently. First, I was able to find an original 1970 rear disk brake brackets which was almost impossible to locate. They are specially machined to house the axle bearing and made to fit the new, old stock JFZ calipers from the same era. I have the original disks and hats but had to send them out to drill the stud holes to a larger size to except the axel studs. I will have photo of them as soon as they come back from the machine shop.
Left: Bracket attached to Olds/Pontiac 9.3 rear end housing.
JFZ Brake Calipers
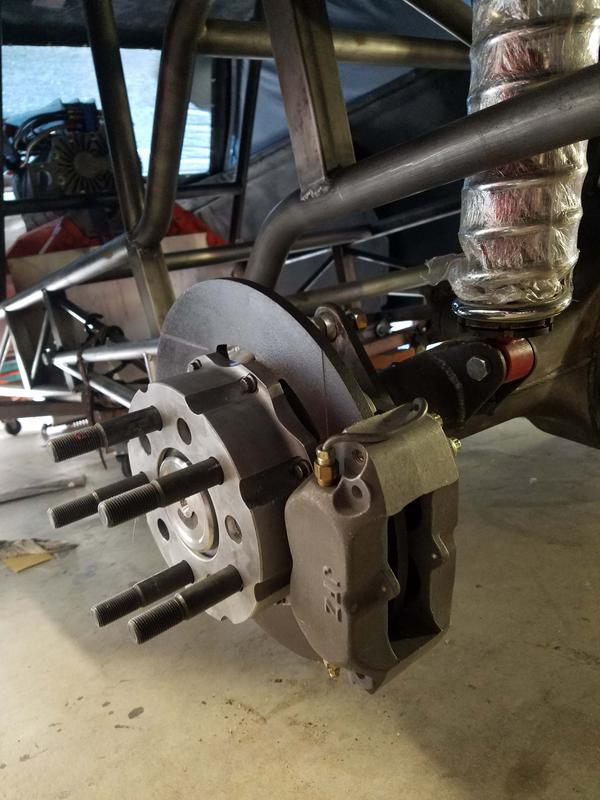
Vintage disk and hat installed.
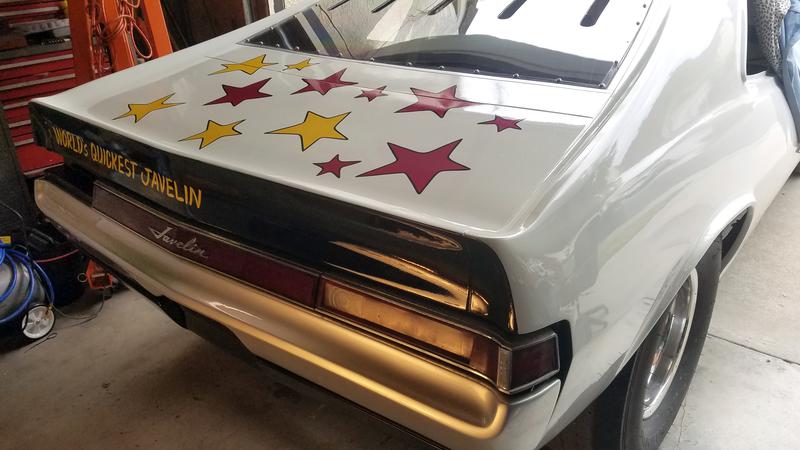
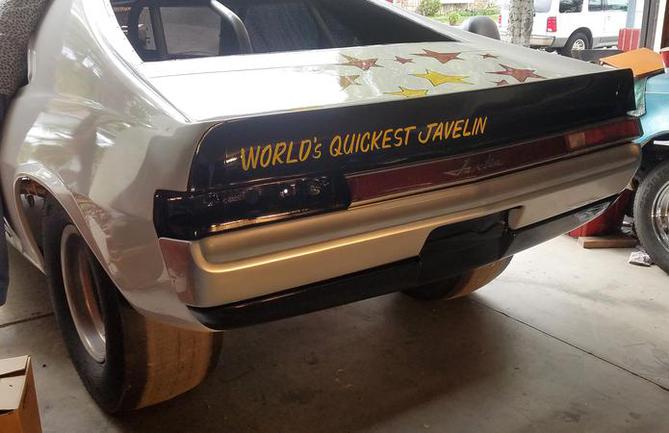
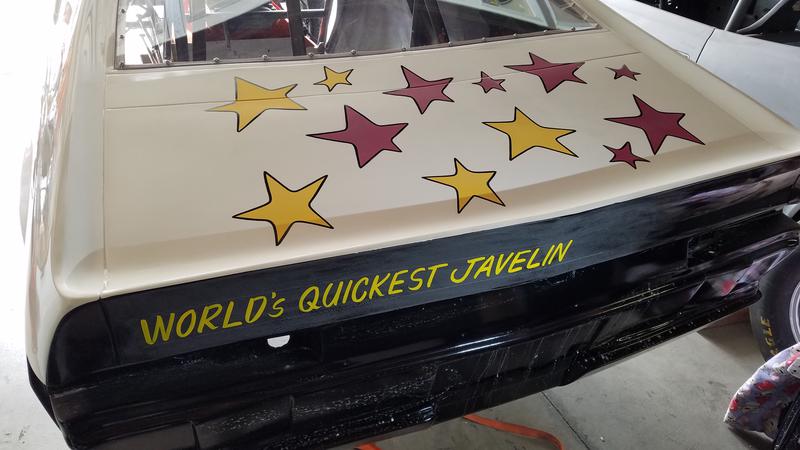
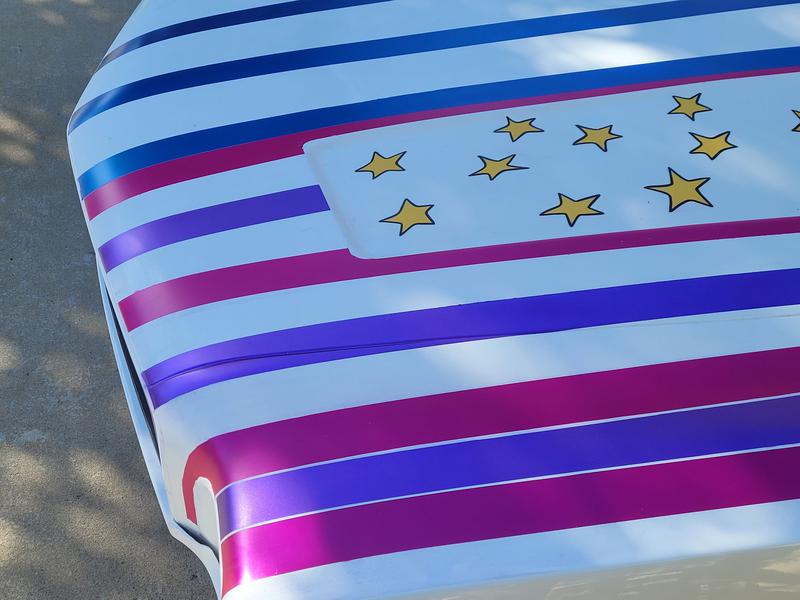
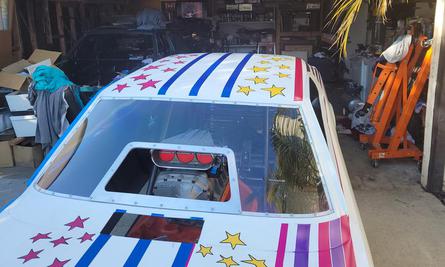
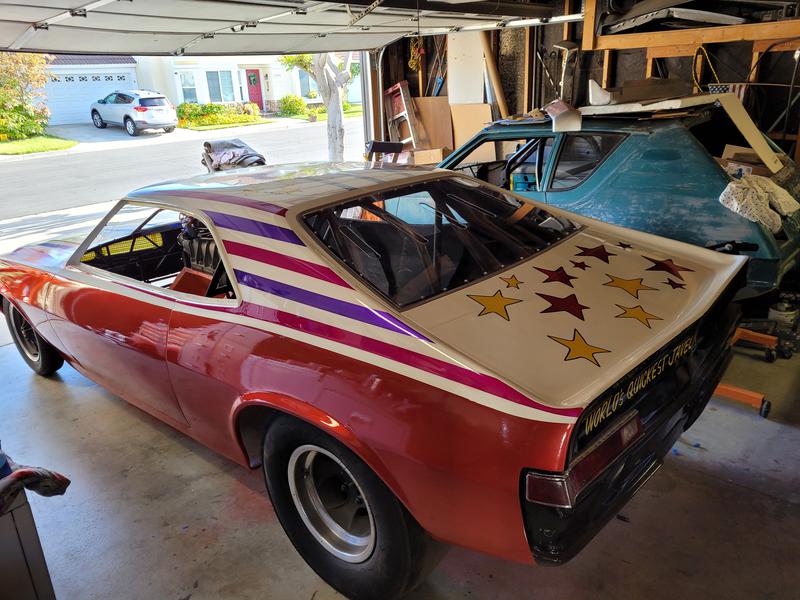
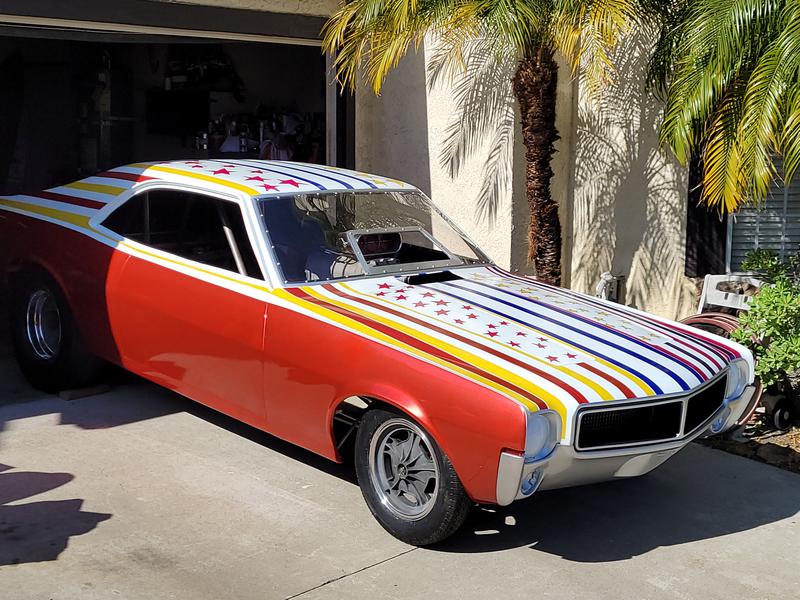
Painted rear window molding bumper and clear coat complete rear part of the body. I'll be working on the hood area next, pretty complicated graphics. I have the stars finished on the hood just need to do the stripes.
I need a rear left tail light if you know of any original ones please contact me at georgehelmerracing@gmail, thanks.
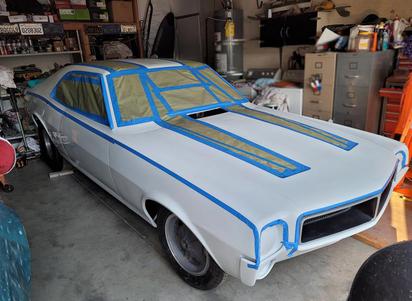
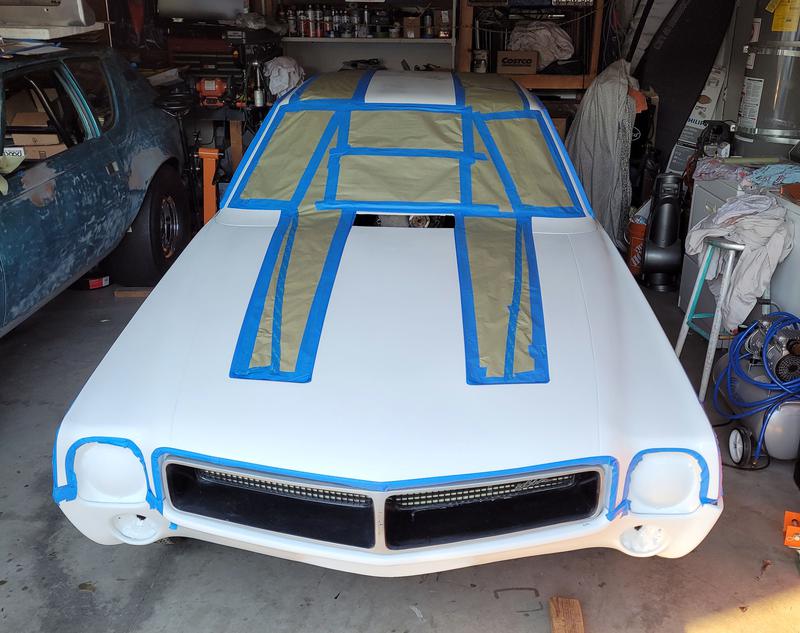
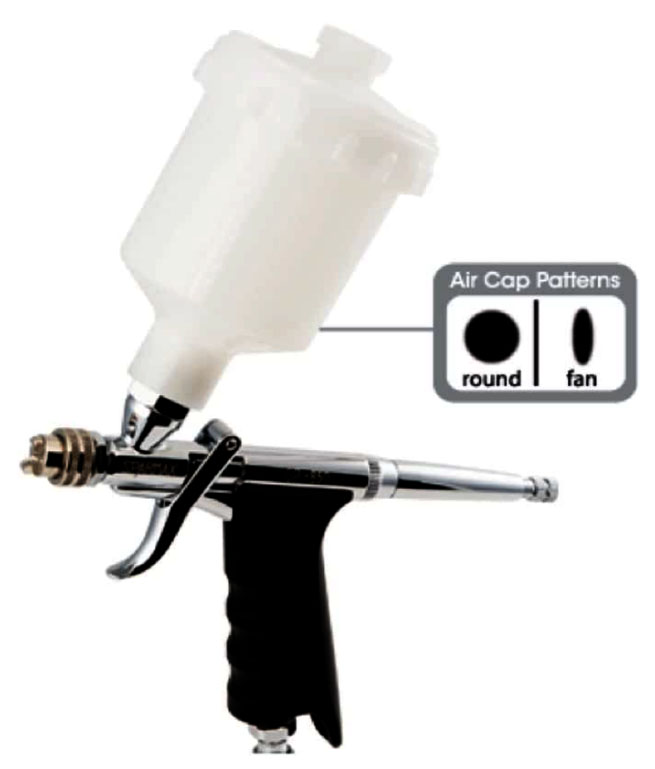
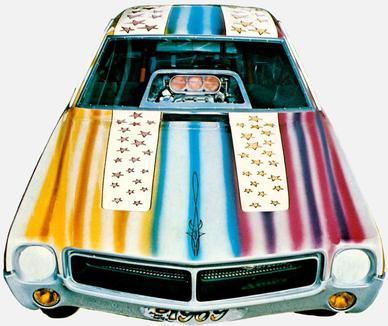
Taping for graphics on hood and roof. This will be a one shot job, no mistakes. The original car in on the left As you can see the roof and hood stripes are not of the same width, the strips vary by a bunch. It was all done freehand. We'll see how my strips go. Using a Sparmax Pistol Grip GP850 Spray Gun Airbrush (on the right) and my small quiet air compressor.
The two rollbar notches from the inside.
The two rollbar notches repaired and primered.
Halibrand 10x16 rims.
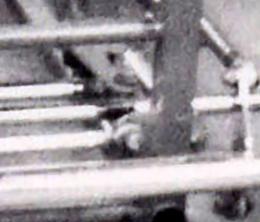
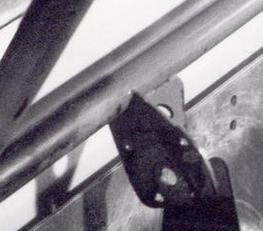
Above: Top radis rods completed now. Keeping the rods close to the frame about 1/2-inch clearance. Compare to the original radis rod below.
Below new phots just located part of Tom West collection now owned by my friend Lou Hart.

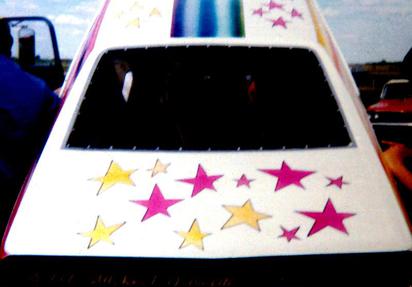
This email came in he other day. It's from the owner of Javelin in the late 70s. It was the Rain Maker then they changed to The The Maker. Alway great finding more history.
Good morning George,
I was tipped off to your website by a buddy! I am VERY happy to see the car restored!
We owned the car in the late 70’s. We bought the car from Bob Roper and if my memory serves me correctly, Jim Brown was running the car at that time. We ran it two seasons.
We sold the car in 79 or 80 to pursue other racing. As I was just 17. I followed my older brother to whatever he wanted to do! Perhaps you know the next owner, but I remember he lived in Red Deer Alberta.
As a lifetime racer and car builder, I am VERY happy that you took on restoration of the car.
I have enclosed a picture of the car when we owned it.
Regards,
Don Lawrence
House of Kolor paints.
House of Kolor paints.
House of Kolor paints.
House of Kolor paints.
House of Kolor paints.